How to Wire a Light Bar Wiring Harness
Different light bars require specific wiring harnesses tailored to their unique needs, and similarly, various vehicles, trucks, and ATVs use distinct harnesses for their light bars. While the overall materials used are often similar, the key differences lie in the wiring configurations, wire gauges, and lengths. Each application demands particular specifications to ensure proper function and durability. Whether it’s for a high-powered truck light bar, off-road, trailer, or a compact ATV setup, the harness design will vary to accommodate factors such as voltage, current, and environmental conditions, ensuring optimal performance and safety across different applications.
Tools/Materials
- Wiring harness components
- Relay
- fuse
- switch
- connectors
- Wire
- Wire strippers, crimpers, heat shrink tubing
- Zip ties, electrical tape
- Extra wire (match gauge to total current)
Step-by-Step Instructions
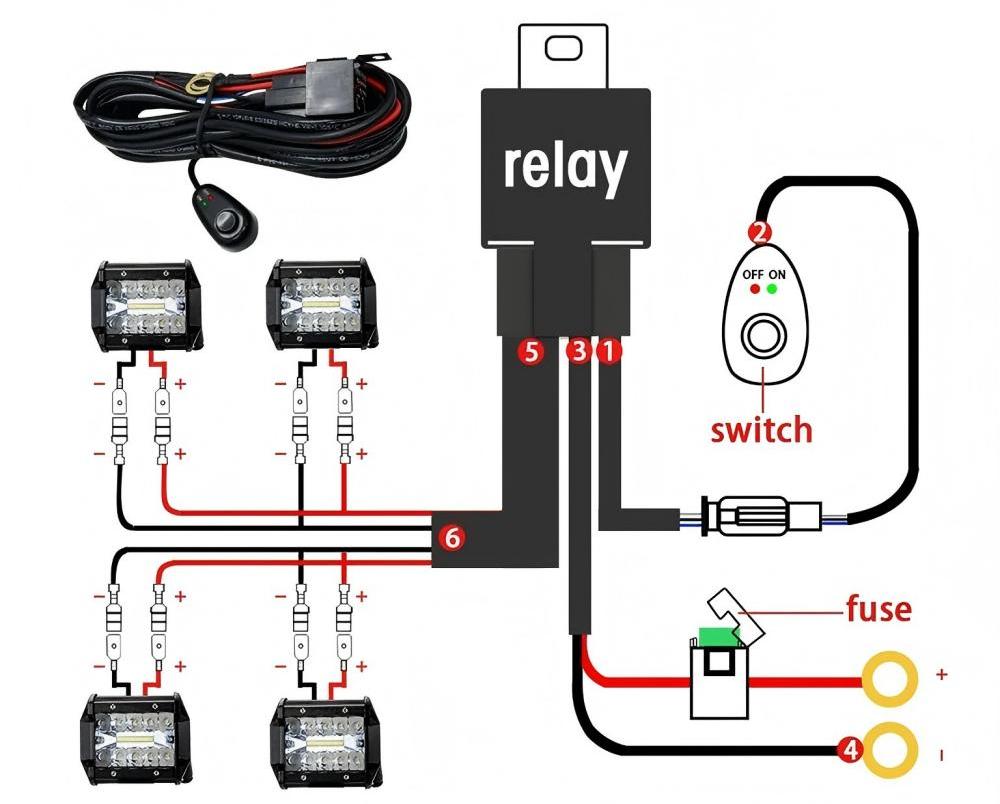
Wiring Diagram
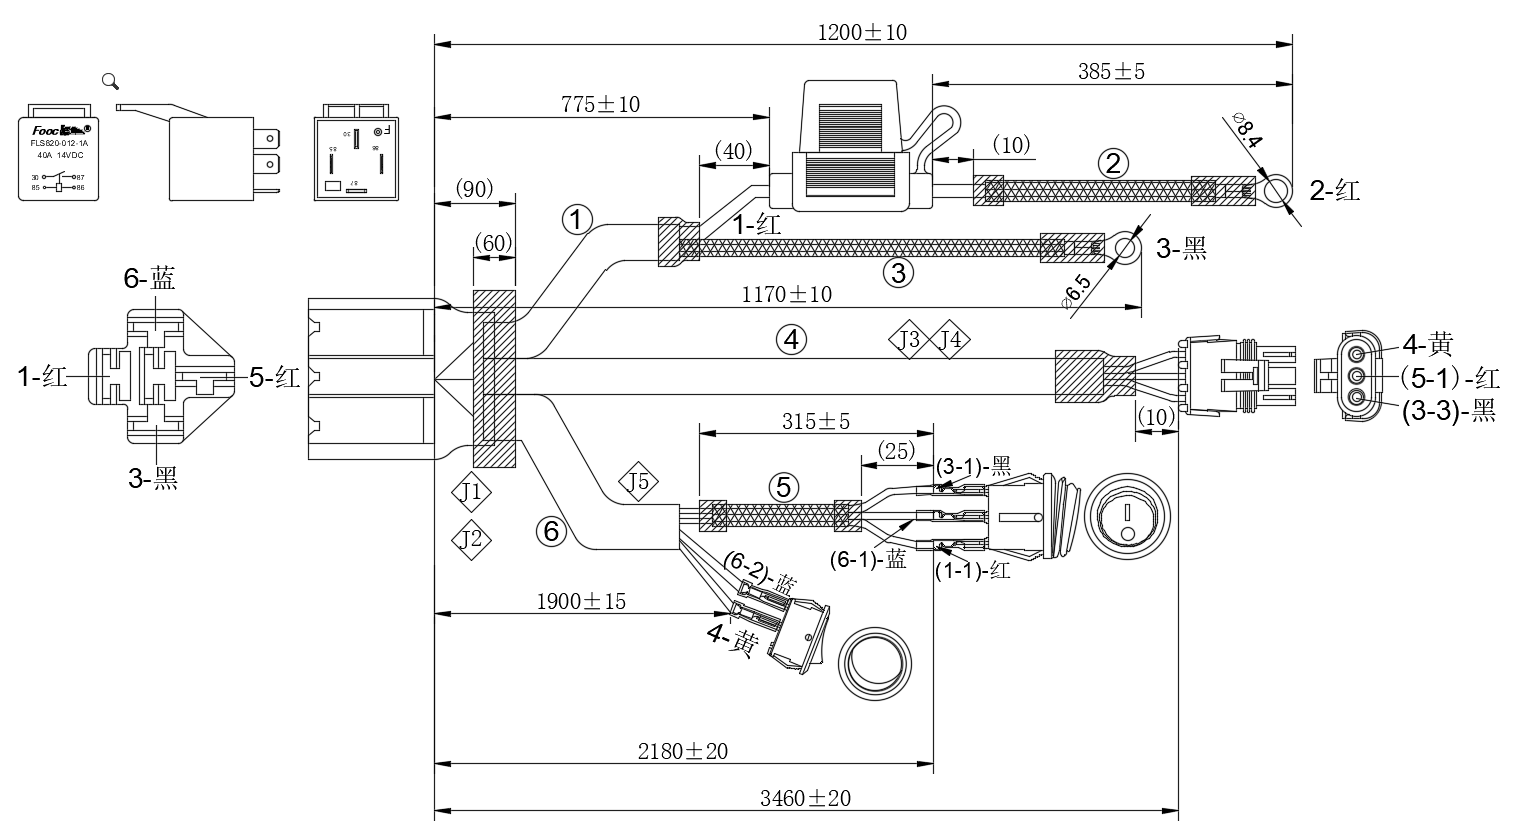
When planning the installation of a light bar, carefully consider the mounting location for both the light bar and the switch inside the vehicle. Plan the wiring route from the light bar to the battery and the switch, ensuring the wires are shielded from heat, sharp edges, and moving parts to prevent damage. The number of light bars you intend to wire will affect the design of the harness, as different light bars require distinct wiring configurations. It's essential to account for the specific power needs of each light bar, as well as the overall layout of the vehicle, to ensure safe and reliable operation.
Mount the Light Bar
Begin by securing the light bar to your vehicle using the supplied mounting brackets and hardware. The mounting process should ensure the light bar is firmly fixed, with no wobbling or shifting, and properly aligned. Double-check the position before tightening everything in place to ensure the light bar is oriented correctly for maximum performance. Whether you are mounting it on the roof, front bumper, or another location, make sure the light bar is securely attached and there is adequate space around it for airflow and clearance, avoiding obstructions that could affect its functionality.
Connect the Light Bar to the Wiring Harness
Once the light bar is mounted, locate the connector on the wiring harness that is designed to fit the light bar’s plug. Connect the wiring harness to the light bar by aligning the connectors and pushing them together firmly until they click into place. Most wiring harnesses come with waterproof connectors to protect the connections from moisture and the elements. Make sure to check that the connector is securely attached to avoid any loose or poor connections, which could result in the light bar malfunctioning. The proper connection ensures reliable power transfer to the light bar.
Connect the Relay
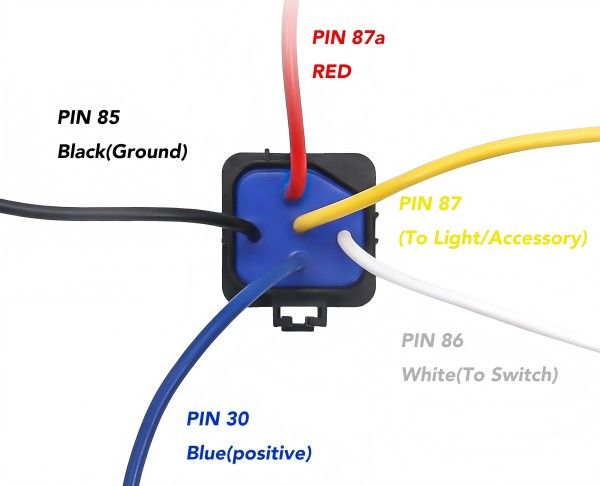
Relay typically has four or five pins.
- 30: Connects to the positive terminal of the battery (via the fuse).
- 85: Connects to the ground (negative terminal).
- 86: Connects to the switch (positive wire from the switch).
- 87: Connects to the positive wire of the light bar.
- 87a: (If present) is not used in this setup.
Follow the wiring diagram provided with your harness to connect the relay correctly.
Connect the Fuse
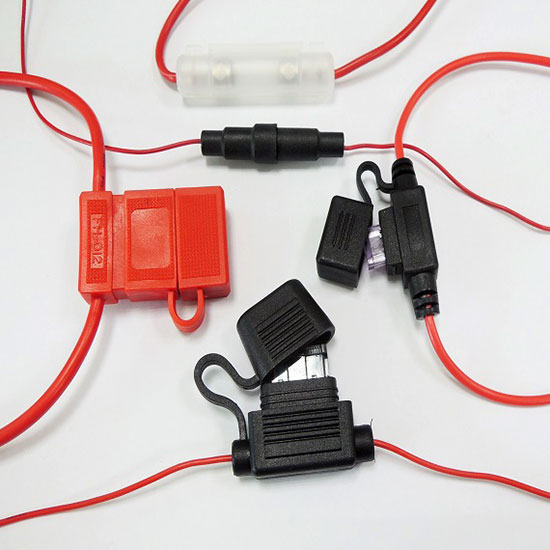
The fuse holder should be connected to the positive terminal of your vehicle’s battery. The fuse is an important safety feature, as it prevents the wiring circuit from overloading by interrupting power flow if the current exceeds the fuse’s rating. Ensure the fuse’s rating aligns with the specifications in the harness instructions to prevent any electrical damage or fire hazards. Properly installing the fuse at the battery’s positive terminal helps protect the wiring, relay, and light bar from electrical surges or shorts, giving you peace of mind that your setup is safe and protected.
Install the Switch
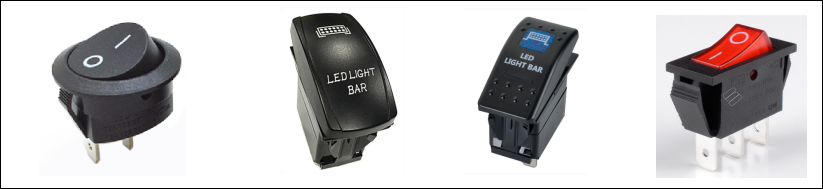
Choose a convenient and easily accessible location inside the vehicle to mount the switch. Common places include the dashboard, center console, or near the driver’s seat. Once you’ve selected the location, mount the switch securely. To wire it into the system, connect one wire from the switch to the relay (pin 86). The other wire should be connected to a ground source, such as a clean, unpainted metal part of the vehicle’s chassis. This completes the circuit for the switch and allows you to control the light bar with ease from inside the vehicle.
Ground the Wiring Harness
Proper grounding is essential for the wiring harness to function correctly. Typically, the ground wire in the harness is black, and it should be connected to a clean, unpainted section of the vehicle’s chassis or metal frame. This ensures a solid connection to the vehicle’s ground system, allowing the electrical current to flow properly. Be sure the area where you attach the ground wire is free from rust, paint, or debris to ensure a secure and effective connection. A poor ground can lead to electrical issues, so double-check this step to avoid problems with the light bar.
Secure the Wiring
Once the wiring connections are complete, use zip ties to secure the wiring along the planned route. Ensure the wires are held firmly in place and routed away from any moving parts, sharp edges, or heat sources that could cause damage. It's a good idea to leave a little slack in areas where the wiring may need to move or bend. Additionally, use electrical tape or heat shrink tubing to cover any exposed wires or connections to prevent corrosion or wear. Keeping the wiring neat and secure not only protects the harness but also contributes to the vehicle’s overall aesthetic.
Test the Light Bar
After completing the installation, turn on your vehicle’s ignition and flip the switch to test the light bar. The light bar should turn on immediately if all the connections are correct. If it doesn’t power on, start by double-checking the fuse, relay, and ground connection. Ensure that all connectors are tightly attached and that no wires are pinched or exposed. If everything is connected correctly, your light bar should be functioning as intended. Testing now will help identify and resolve any potential issues before using the light bar on the road.
Multiple Light Bars
Wiring multiple light bars requires careful planning to ensure your electrical system can handle the combined load. Key considerations include understanding the power requirements of each light bar, selecting the appropriate wire gauge to prevent overheating and voltage drop, and choosing a relay with sufficient capacity to handle the total amperage. Parallel wiring is typically used, as it ensures each light receives the correct voltage, while the total current increases with each added bar. It's also important to use fuses that match the amperage draw to protect your system from overloads and shorts. Proper planning helps avoid damage and ensures reliable operation.
Single Light Bar
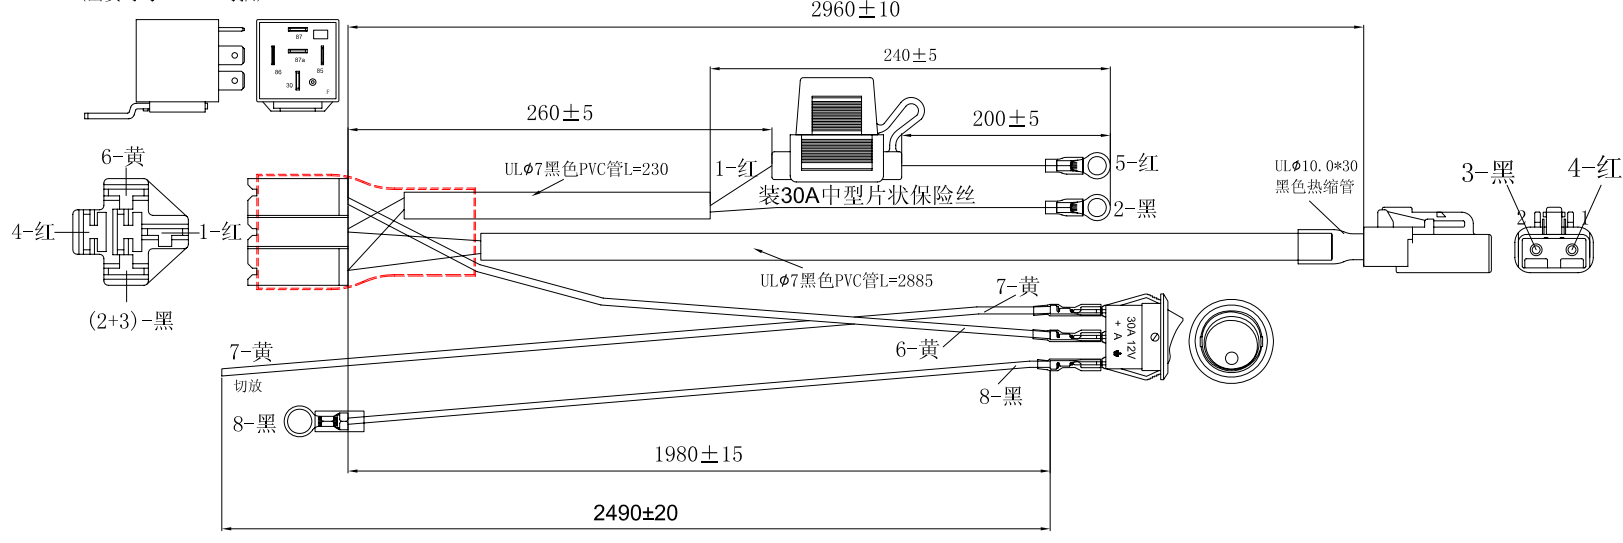
For a single light bar, match the relay and fuse to the light's amp rating. For example, if the light draws 10A, use a 10–15A relay and fuse. Follow the standard wiring harness instructions, connecting the positive wire from the light bar to the relay's 87 terminal and the negative wire to a solid ground point. Ensure the relay is properly connected to the battery (via the fuse), the switch, and the ground. Secure all connections with waterproof connectors and test the setup to ensure the light bar functions correctly before finalizing the installation.
Two Light Bars
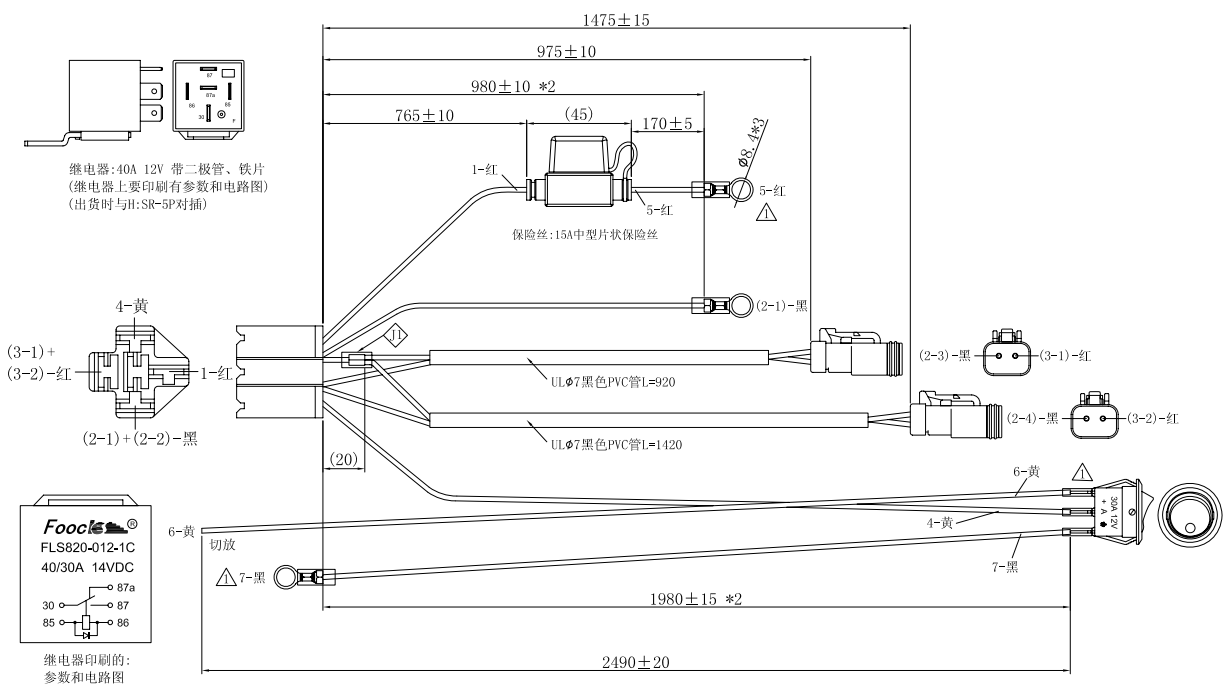
When wiring two light bars, calculate the total current by multiplying the amp draw of one light by two (e.g., 2 × 10A = 20A). Upgrade the relay to 20–30A and the fuse to 25–30A, and use 12 AWG wire to handle the increased load. Wire the light bars in parallel by connecting both positive wires to the relay’s 87 terminal and both negative wires to a common ground. This ensures each light receives full voltage. Secure the wiring with zip ties and test the system to confirm both light bars operate simultaneously without issues.
Three Light Bars
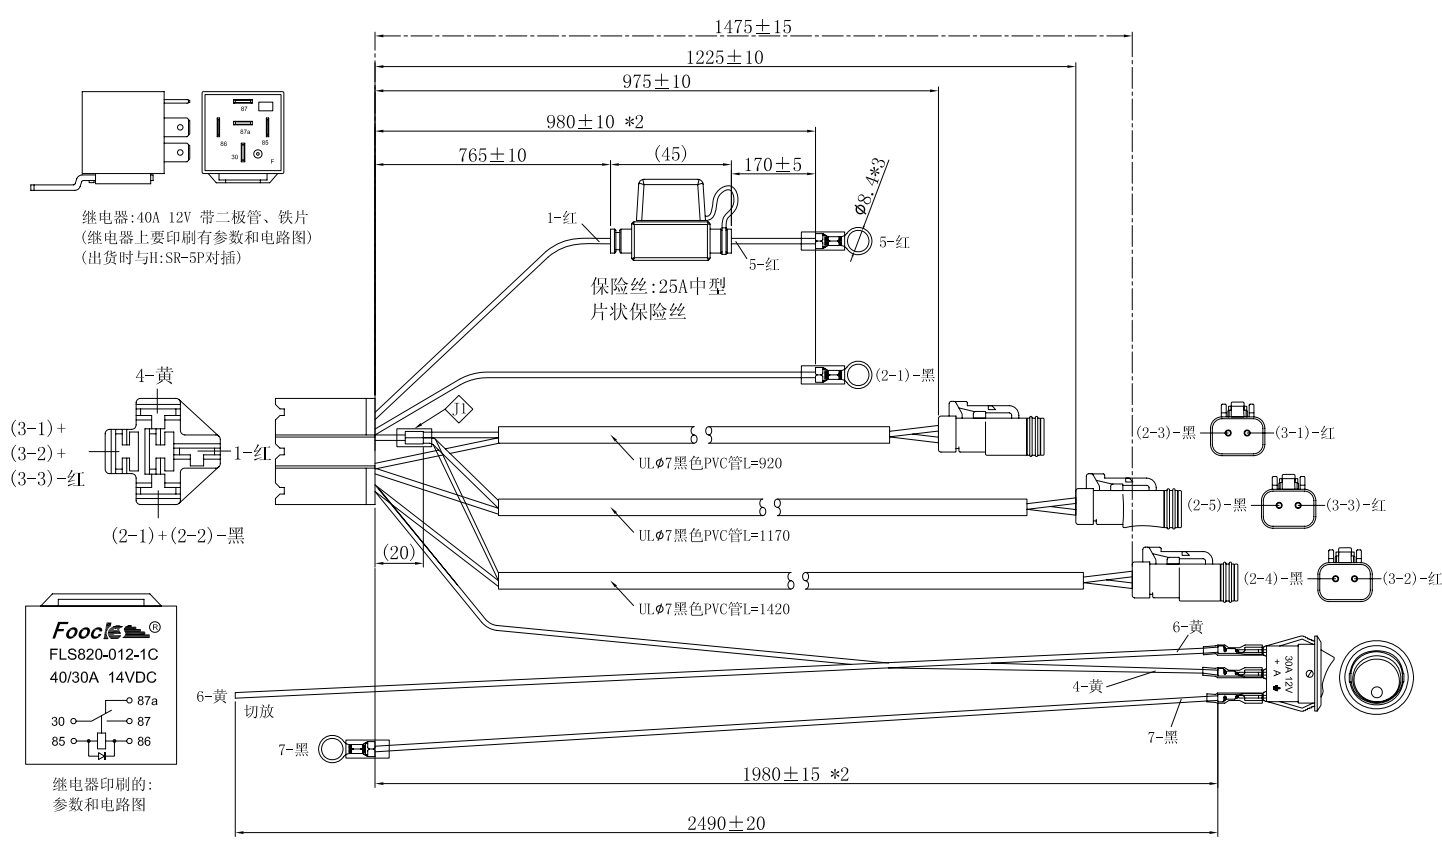
For three light bars, calculate the total current by multiplying the amp draw of one light by three (e.g., 3 × 10A = 30A). Use a 30–40A relay, a 35–40A fuse, and a 10 AWG wire to handle the higher current. Connect all three positive wires to the relay’s 87 terminal using a distribution block or by splicing the wires together. Ground all negative wires to the chassis. Ensure the wiring is secure and protected from heat or abrasion. Test the setup to verify all three light bars function correctly and adjust connections if necessary.
Four or More Light Bars
When wiring four or more light bars, calculate the total current by multiplying the amp draw of one light by the number of lights (e.g., 4 × 10A = 40A). Use a 40–50A relay, a 50A fuse, and an 8 AWG wire to handle the load. Connect the relay’s 87 terminal to a power distribution block, then run separate wires from the block to each light bar. Ground all negative wires to a heavy-duty ground point or multiple ground connections. Secure the wiring and test the system to ensure all light bars operate correctly and safely.
Summary
Wiring multiple light bars (1, 2, 3, 4, or more) requires careful planning to handle the electrical load. Key considerations include calculating total current, using proper wire gauge, and ensuring the relay and fuse match the combined amp draw. Light bars should always be wired in parallel to maintain full voltage and prevent dimming. For larger setups, upgrade components like relays, fuses, and wires to handle higher currents. Use distribution blocks for multiple lights and ensure secure, waterproof connections. Always test the system before finalizing the installation to ensure safety and functionality. Proper planning ensures reliable performance for any number of light bars.
Customize Your Wire Harness
Send your sample or drawing/schematic for quote price→ Feedback with quotation(1~3 days) → Confirm quotation → Arrange sample you for approval→ [Make mold if needed (7 days) →Mold test] → Making samples(1~3 days)→ Samples test(Approval) → place order for Mass production(2~3 weeks)→ Quality checking→ Packing → Delivery → After Service → Repeat Order.
About Us
