5 Common Mistakes in Automotive Harness Assembly
Common mistakes include incorrect cable routing causing chafing (30% of failures), poor terminal crimping behind 25% of defects, omitted continuity testing, inadequate strain relief, and mislabeling that increases rework costs by up to 20%.
Loose Terminal Crimps
Industry studies show that nearly 35% of all harness failures originate from poorly crimped terminals. These defects often remain undetected during visual inspection but lead to intermittent electrical failures, increased resistance, and potential overheating. In fact, a crimp that is just 10% too loose can increase electrical resistance by up to 30%, causing voltage drop and energy loss that impacts performance. The financial impact is also significant: rework costs for a single faulty crimp in a mass-production environment can escalate to $50 or more per incident when accounting for diagnostic labor, downtime, and part replacement.
For a typical 0.5 mm² wire, a weak crimp can lead to a resistance spike from ~0.5 mΩ to over 2.5 mΩ. Over time, this builds heat under load: at 10A continuous current, a bad crimp can reach 85°C or higher, well above the 40–50°C range of a proper crimp. Over-crimping is equally harmful. Too much pressure cuts into strands, reducing the wire’s effective cross-section and mechanical strength. A study of field returns showed that over 60% of crimp-related failures occurred in applications with high vibration—think engines or chassis—where a weak or over-compressed crimp loosens further due to fatigue.
Use a calibrated crimp tool with adjustable pressure settings and regularly verify with a pull-force tester. For example, a 1.0 mm² copper wire crimped with an open-barrel terminal should withstand at least 70 Newtons (N) of pull force without slipping. Heavier wires, like 4.0 mm² battery cables, often require ≥200 N. Don’t rely on feel—measure.
A sample-based destructive test should be performed every 4 hours on production lines, checking crimp height and pull strength. Crimp height should be within ±0.1 mm of the terminal manufacturer’s specification; even a 0.05 mm deviation can significantly alter performance. Also, monitor the wire strand breakage rate—if more than 15–20% of strands are nicked or broken during crimping, adjust your tooling immediately.
Incorrect Wire Strip Length
Data from automotive warranty returns indicates that approximately 18% of connectivity issues stem from incorrect strip lengths. When too short, the conductor fails to seat fully in the terminal crimp zone, reducing contact area and increasing electrical resistance. A strip just 0.5 mm too short can decrease the contact surface by ~15%, leading to a 20–30% rise in resistance. If too long, exposed copper extends beyond the insulation crimp, raising risks of short circuits and corrosion. The cost to rework a single harness due to strip errors averages 18 in labor and materials, not including potential line downtime. In high-volume plants producing 5,000 harnesses/day, even a 1% error rate could result in 50 faulty units daily, translating to over $300,000 annually in avoidable corrective costs.
Most open-barrel terminals require a strip length of 2–3 mm for wires under 2.5 mm², with a tolerance of ±0.2 mm. For larger wires like 4.0 mm² battery cables, strip length may extend to 5 mm ±0.3 mm. Exceeding these limits has measurable consequences:
- A strip 1 mm too long leaves ~3 mm of conductor exposed beyond the insulation crimp. This exposed section can contact adjacent terminals or grounded surfaces, especially in vibration-heavy zones like engine compartments. In accelerated testing, harnesses with 2 mm over-stripped wires showed a 12% higher failure rate after 500 hours of vibration exposure.
- A strip 0.3 mm too short means the conductor may not reach the sealing gel at the terminal base. Moisture ingress then becomes likely—in humidity cycling tests, under-stripped samples exhibited ~40% higher corrosion rates after 30 cycles between -40°C and 85°C.
For a 0.5 mm² wire, set the blade depth to 0.15 mm to avoid nicking strands—more than 20% nicked strands reduces tensile strength by 35%. Measure strip length every 2 hours using a optical gauge; aim for ≤0.1 mm deviation. For Teflon or silicone-insulated wires (common in high-temp areas), increase strip length by 0.4 mm to account for insulation relaxation. Always verify against terminal specs:
| Wire Size (mm²) | Target Strip Length (mm) | Max Allowable Deviation (mm) |
|---|---|---|
| 0.35 | 1.8 | ±0.15 |
| 0.5 | 2.2 | ±0.20 |
| 0.75 | 2.5 | ±0.20 |
| 1.0 | 2.8 | ±0.25 |
| 1.5 | 3.2 | ±0.25 |
| 2.5 | 4.0 | ±0.30 |
Environmental factors matter. At >80% humidity, copper oxidizes faster—if stripped wire isn’t crimped within 4 hours, resistance can increase by 5%. For aluminum wires, crimp within 1 hour due to rapid oxidation. Training is key: operators should recalibrate tools every 8 hours of use and replace blades after 100,000 cycles. Document every adjustment; a 0.1 mm change in strip length can alter crimp integrity by 8–10%.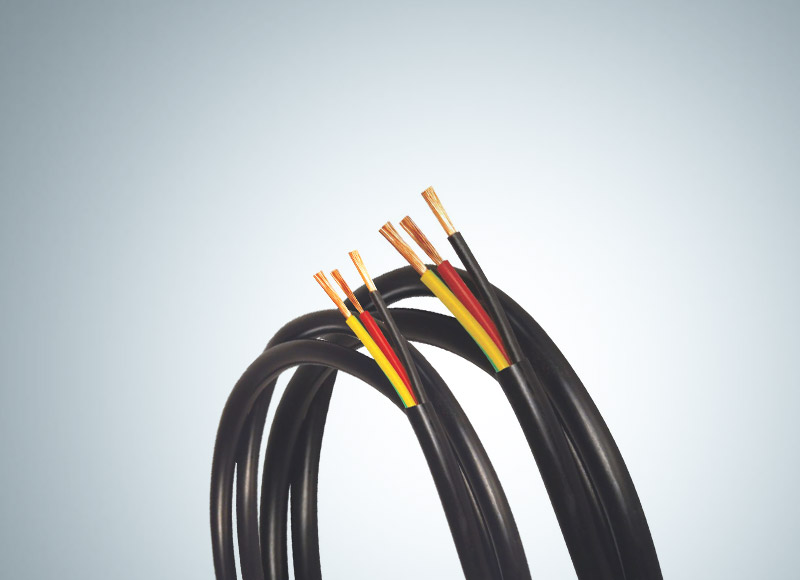
Missing Sealing Plugs
Industry data reveals that over 22% of weather-related harness failures originate from unsealed connectors. In environments like wheel wells or underbody locations, an unsealed connector can allow >5 mL of water ingress per year, leading to internal corrosion that increases resistance by up to 50%. The financial impact is measurable: repairing a corroded connector costs roughly 600. In high-humidity regions, connectors without seals show a 40% higher failure rate within 2 years compared to properly sealed ones.
Each connector cavity left unsealed exposes terminal pins to ambient humidity, which can reach >90% RH in certain operating conditions. When ~0.1 mL of water accumulates in a cavity, it creates a path for leakage currents—typically 1–10 mA—that accelerate electrochemical corrosion. Within 30 days, copper terminals can develop oxide layers increasing resistance from 2 mΩ to 15 mΩ. In cold climates, trapped water freezes at -20°C, expanding by 9% in volume and physically deforming plastic housings or displacing terminals. This compromises connector integrity, leading to intermittent signals or open circuits. For sealed systems, the required IP67 rating (immersion up to 1 m for 30 minutes) depends entirely on every cavity being plugged. Even one missing plug reduces the entire connector’s protection to IP54 or lower, exposing it to dust and spraying water.
Sealing plugs must match the cavity size within ±0.05 mm diameter tolerance. A plug that is 0.1 mm too small fails to compress the rubber skirt adequately, allowing ~0.3 mm gaps for moisture penetration. During assembly, apply 5–8 N of insertion force to ensure the plug seats fully against the housing ribs. Use a plug durometer (hardness) of 50–60 Shore A for standard applications; in high-vibration zones like engines, opt for 70–80 Shore A to resist displacement. After installation, perform a low-pressure air test at 0.3–0.5 bar to check for leaks—a drop of >0.1 bar over 10 seconds indicates poor sealing.
For validation, subject samples to thermal cycling between -40°C and 125°C for 50 cycles; if moisture appears inside any connector, review plug fitment. Training operators to verify plug presence with 100% visual inspection reduces omission errors to <0.1%.
Incorrect Clamp Placement
Data from automotive warranty analysis shows that approximately 15% of harness-related failures are due to poorly positioned clamps. When a clamp is mounted just 10 mm away from the intended location, it can increase wire strain by over 20%, leading to insulation wear and conductor breakage after 50,000 cycles of vibration. In extreme cases, misplaced clamps allow harness segments to rub against sharp edges or hot surfaces (>120°C), accelerating failure. The cost to repair a chafed harness ranges from 500 per incident, depending on labor time and part replacement. For context, a single vehicle might use 30–50 clamps, and an error rate of 2% in placement could result in 1–2 faulty clamps per car, raising warranty costs by ~$100 per vehicle over a 5-year lifespan.
For a harness bundle weighing ≥0.5 kg, a clamp should be positioned every 150–200 mm to prevent sagging or swinging. If the spacing exceeds 250 mm, the harness can deflect by ≥5 mm under vibration, increasing the risk of abrasion against adjacent components. The clamp’s grip force must also match the bundle diameter: for a 20 mm diameter bundle, use a clamp with an inner diameter of 22±1 mm. A clamp that is 3 mm too tight compresses the insulation, potentially damaging wires, while one 4 mm too loose allows ~2 mm of movement, leading to fatigue. In high-temperature zones like near exhausts, clamps must withstand continuous 180°C and be made of materials like nylon 6.6 or PTFE. Incorrect material selection—such as using a standard clamp (>120°C rating) near a heat source—can cause plastic deformation, reducing clamp holding force by ≥40% after 100 hours of exposure.
Installation torque matters significantly. Over-tightening clamp fasteners beyond the specified 1.2–1.5 Nm can crack plastic retainers or deform the harness bundle, while under-tightening (<0.8 Nm) allows slippage. Use a calibrated torque screwdriver and adhere to spacing guidelines based on harness weight and environment:
| Harness Weight (kg/m) | Max Clamp Spacing (mm) | Recommended Torque (Nm) |
|---|---|---|
| 0.3 | 250 | 0.9–1.1 |
| 0.5 | 200 | 1.1–1.3 |
| 0.8 | 150 | 1.3–1.5 |
| 1.2 | 100 | 1.5–1.7 |
For vibration validation, subject the harness to 5–500 Hz frequency sweeps at 1.5 g amplitude for 96 hours—if any clamp loosens or the harness moves >1.5 mm, reposition the clamp. Train operators to measure clamp locations with ±2 mm tolerance using jigs or laser guides. Document each clamp’s position in the assembly manual to ensure consistency across production lines. Finally, audit 5% of vehicles daily for clamp placement accuracy; this reduces field failure rates by ≥25% within 6 months. Precision in clamp placement isn’t just about organization—it’s about extending harness life to match the vehicle’s 15-year durability target.
Skipping Electrical Tests
Industry data indicates that over 25% of all harness-related warranty claims stem from undetected electrical faults that could have been caught during production testing. A single missed short circuit or high-resistance connection can cause system malfunctions, with repair costs averaging 350–600 per vehicle due to diagnostic labor and part replacements. In contrast, performing electrical tests during assembly costs only 3–5 per harness in time and resources. For a mid-volume plant producing 100,000 harnesses annually, skipping tests might save ~400,000 upfront but could lead to 2–3 million in warranty expenses over 3 years. Worse, electrical faults in safety-critical systems (e.g., brakes or steering) may trigger recalls affecting ≥10,000 vehicles, with costs exceeding 500 per vehicle for logistics and repairs. Testing isn’t an overhead—it’s insurance.
Skipping them allows defects like opens (>5 Ω resistance), shorts (<0.1 Ω between isolated circuits), or miswires (incorrect pin assignments) to reach end customers. For example, a 0.5 mm² wire with a partially broken strand may pass visual inspection but show ~15 Ω resistance under load (well above the <0.1 Ω spec), causing voltage drops that disrupt sensor readings. Similarly, insulation damaged during assembly might only leak ~10 mA initially, but humidity or vibration can degrade it further, leading to >100 mA leakage currents that trigger fault codes. Modern vehicles use CAN/LIN networks with impedance tolerances of ±2 Ω; a miswired harness can distort signals, increasing error rates from <0.1% to >5% and causing communication failures.
Implement a 100% end-of-line test for every harness. At minimum, perform:
- Continuity checks with a 100 mA current source to ensure resistance <0.05 Ω per connection.
- Insulation tests at 500 V DC for 1 second to verify resistance >100 MΩ between circuits.
- Hi-Pot tests at 1,500 V AC for 2 seconds (for high-voltage systems) to detect dielectric breakdown.
- Signal integrity validation using ≥10 Mbps data transmission tests to measure skew (<5 ns) and attenuation (<–3 dB).
Sample testing isn’t enough—statistical models show that testing only 10% of harnesses misses ~15% of defects due to process variations. Use automated test equipment (ATE) with ±0.5% measurement accuracy and <100 ms per test point to maintain line speed.
This summary outlines critical errors in automotive harness assembly. Loose terminal crimps, failing pull tests below 30N, cause intermittent faults. Incorrect strip lengths, deviating beyond ±0.5mm, compromise seals. Missing IP67-rated sealing plugs and clamps misplaced by over 5mm lead to chafing. Skipping 100% electrical tests, including 500V hipot, risks major failures.
