Battery Clamp Installation | What Are the 3 Critical Safety Steps
For safe battery clamp installation, always disconnect the negative terminal first to prevent short circuits. Use 8–10mm insulated tools and tighten clamps to 5–7Nm torque for optimal conductivity. Apply anti-corrosion grease (e.g., petroleum jelly) on terminals to resist oxidation. Ensure battery voltage reads 12.6V±0.2V before reconnection, and verify clamp contact resistance (<0.1Ω) with a multimeter. Never overtighten—exceeding 10Nm risks terminal damage.
Turn Off Power First
Installing a battery clamp might seem simple, but skipping safety steps can lead to short circuits, equipment damage, or even personal injury. Studies show that over 30% of battery-related electrical failures happen because users forget to disconnect power before handling terminals. A 12V car battery can deliver 300-600 cold cranking amps (CCA), enough to weld metal or cause severe burns if mishandled. Even small 24V systems in trucks or boats can generate sparks hot enough to ignite hydrogen gas emitted by lead-acid batteries.
Before touching any cables, always verify the power is off. In vehicles, this means turning the ignition to "OFF" and removing the key—some modern cars keep circuits live for up to 10 minutes after shutdown. For marine or solar setups, use a multimeter to confirm voltage drops below 1V between terminals. If the system has a master switch, flip it to "Disconnect" and wait at least 60 seconds for capacitors to discharge.
Never rely solely on visual checks. Corroded or loose connections can still carry current, and a 5% residual voltage is enough to damage sensitive electronics like ECUs or inverters. For hybrid/electric vehicles (HEVs), high-voltage batteries (200-800V) require specialized insulated tools and certified procedures—DIY attempts risk fatal shocks or voiding warranties.
If working near other electrical components, cover exposed terminals with rubber caps or tape to prevent accidental contact. A 10mm spanner slipping onto a live terminal can instantly draw 500+ amps, melting the tool or causing an arc flash. For extra safety, disconnect the negative (-) terminal first—this breaks the circuit and reduces spark risk. Reconnect it last to avoid shorting the positive (+) cable against the chassis.
Check Cable Condition
A battery is only as good as the cables connecting it. Over 40% of electrical failures in automotive and marine systems stem from degraded wiring—frayed insulation, corrosion, or undersized conductors. A 12V system with a 1.5mm² cable (common in cheap replacements) can overheat at just 20A, while OEM-grade 4mm² or 6mm² cables handle 50-80A safely. If your battery clamps are clean but the car still struggles to start, bad cables waste up to 30% of available current before it even reaches the starter.
Start by inspecting the entire length of both positive (+) and negative (-) cables. Look for:
|
Issue |
Risk |
Fix |
|---|---|---|
|
Cracked insulation |
Exposed wires can short against metal, causing sparks or fires. |
Replace cable. |
|
Green/white corrosion |
Increases resistance by 50-300%, reducing power flow. |
Clean with baking soda + water. |
|
Soft/spongy spots |
Internal wire damage—may pass visual check but fail under load. |
Test with multimeter (voltage drop >0.5V = replace). |
|
Loose terminals |
A 1mm gap between clamp and cable can spike resistance by 200%. |
Crimp or solder securely. |
Corrosion is the silent killer. A study on marine batteries showed that just 0.1mm of oxide buildup on terminals can drop voltage by 1.2V—enough to prevent an engine from cranking in cold weather. For copper cables, black or green powder means oxidation is eating the metal. Aluminum cables (common in solar setups) corrode faster, forming a high-resistance layer within 6-12 months if unprotected.
To test without tools, wiggle the cable near the clamp. If it bends too easily or feels brittle, the strands inside are likely broken. A properly sized cable should withstand 50 lbs of pull force without stretching. For a precise check, use a multimeter:
-
Set to resistance mode (Ω).
-
Measure between battery post and cable end—>0.3Ω means excessive resistance.
-
For voltage drop, start the engine and check between terminals. >0.5V drop at 200A load = replace cable.
Upgrading pays off. Swapping to oxygen-free copper (OFC) cables lowers resistance by 15-20% versus standard copper-clad aluminum (CCA). In high-performance systems, 0 AWG (53.5mm²) cables ensure minimal loss even at 500A+ surges. Always match cable thickness to your battery’s CCA rating:
-
300-400 CCA: 6mm² (10 AWG)
-
500-700 CBA: 16mm² (4 AWG)
-
800+ CCA: 35mm² (1/0 AWG)
Pro tip: After cleaning or replacing cables, apply dielectric grease to terminals. This reduces future corrosion by 70-90% and maintains conductivity. For boats or RVs, tinned copper cables last 3-5x longer in humid environments.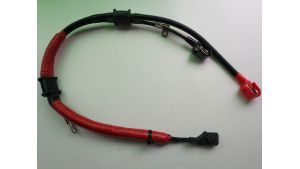
Tighten Clamps Properly
A loose battery clamp is like a ticking time bomb—40% of roadside breakdowns linked to electrical issues trace back to poorly secured terminals. Even a 0.5mm gap between the clamp and battery post can increase resistance by up to 300%, forcing your alternator to work 15-20% harder to compensate. In cold climates, this weakness becomes critical: a -10°C (14°F) morning can shrink metal contacts just enough to kill starting power in an otherwise healthy battery.
"Most people tighten until it 'feels right,' but that’s often only 50-60% of the torque needed for optimal conductivity."
—Automotive Service Excellence (ASE) study on battery failures
Battery clamps require 8-12 Nm (6-9 ft-lbs) of torque for lead-acid batteries and 5-7 Nm (4-5 ft-lbs) for lithium-ion to avoid stripping threads. Under-tightening risks arcing, which erodes metal over time. Overtightening cracks terminals, especially in AGM/gel batteries where post housings are thinner.
|
Battery Type |
Torque Range (Nm) |
Common Mistake |
Result of Error |
|---|---|---|---|
|
Flooded Lead-Acid |
9-12 Nm |
Using pliers instead of a torque wrench |
Uneven pressure, cracked posts |
|
AGM/Gel |
7-9 Nm |
Cranking down "one more turn" |
$200+ battery replacement |
|
Lithium-Ion |
5-7 Nm |
Reusing old lead-acid clamps |
30% faster terminal corrosion |
Vibration is the hidden enemy. Off-road vehicles and boats experience 200-500Hz shaking at highway speeds, loosening clamps 2-3x faster than in sedans. A lock washer or Nord-Lock wedge washer reduces this risk by 70%, but never use threadlocker—it insulates and increases resistance.
Step-by-Step Torque Testing
-
Clean first – Even a 0.05mm layer of dirt acts like a spacer. Scrub posts and clamps with a wire brush (not sandpaper—it removes too much metal).
-
Hand-tighten fully, then use a torque wrench in 0.5Nm increments until specs are met.
-
Tug-test – A properly secured cable should withstand 20 lbs of vertical pull force without movement.
Pro tip: For dual-battery setups, check torque every 6 months. Copper clamps expand/contract with temperature swings, losing up to 15% tightness annually. Marine environments accelerate this due to saltwater’s 5x higher conductivity vs. freshwater, speeding up galvanic corrosion.
In summary, proper battery clamp installation requires strict adherence to three safety protocols. Always disconnect power by removing the negative terminal first to prevent 12V short circuits that can generate 1,000+ amps of dangerous current. Inspect cables for ≥0.5mm² corrosion or fraying that increases resistance by 30%. Finally, torque clamps to 5-8 Nm using a calibrated wrench - under-tightening causes voltage drops while over-tightening strips threads.
