How do I Wire an Ethernet Cable?
To wire an Ethernet cable, first strip 2-3 cm of the outer jacket to expose 4 twisted pairs. Arrange them in T568A/B order (B is standard), trim to 1.5 cm, and insert into an RJ45 connector until wires touch the end. Crimp firmly at 20-30 lbs pressure using a modular tool, ensuring all 8 pins pierce the insulation. Test continuity with a cable tester—each light should sequence 1-8 for 1000BASE-T Gigabit speeds. Use Cat5e/Cat6 cables for optimal 100MHz/250MHz bandwidth.
Choose the Right Ethernet Cable
Picking the right Ethernet cable isn’t just about grabbing the cheapest one off the shelf. The wrong choice can bottleneck your network speed, reduce reliability, or even fail to support your devices. In 2023, over 60% of home network issues were traced back to incorrect cable selection, with Cat5e still being the most misused cable in setups requiring Gigabit (1,000 Mbps) or higher speeds.
Ethernet cables are categorized by "Category" (Cat) ratings, each with different speed, bandwidth, and shielding capabilities. The most common types today are Cat5e, Cat6, Cat6a, and Cat8, with prices ranging from 0.10 to 3.00 per foot, depending on quality and shielding. If you’re running a 10 Gbps network, a Cat6a cable (500 MHz bandwidth, 100m max length) is the minimum requirement, while Cat5e (100 MHz, 1 Gbps) is only suitable for basic home use.
| Cable Type | Max Speed | Max Bandwidth | Max Length | Shielding | Best Use Case | Avg. Price/ft |
|---|---|---|---|---|---|---|
| Cat5e | 1 Gbps | 100 MHz | 100m | UTP (unshielded) | Home networks, VoIP | 0.10 - 0.30 |
| Cat6 | 1 Gbps (10 Gbps @ 55m) | 250 MHz | 100m | UTP/FTP | Offices, gaming | 0.20 - 0.50 |
| Cat6a | 10 Gbps | 500 MHz | 100m | STP (shielded) | Data centers, 4K streaming | 0.40 - 1.00 |
| Cat8 | 40 Gbps | 2,000 MHz | 30m | Fully shielded | Server rooms, high-speed LAN | 1.50 - 3.00 |
Shielding matters—especially in environments with electromagnetic interference (EMI). UTP (Unshielded Twisted Pair) cables work fine in homes, but STP (Shielded Twisted Pair) or FTP (Foiled Twisted Pair) are better for offices with multiple power cables running parallel. A Cat6a STP cable reduces crosstalk by 30% compared to UTP, ensuring stable 10 Gbps speeds over long distances.
Cable length impacts speed. While Cat6 supports 10 Gbps up to 55m, beyond that, speed drops to 1 Gbps. If you need full 10 Gbps at 100m, Cat6a is mandatory. For short runs under 5m (like connecting a PC to a router), even Cat5e is sufficient, but Cat6 future-proofs your setup for just 20% more cost.
Outdoor or industrial use? Standard Ethernet cables degrade in UV exposure or extreme temps (-20°C to 60°C is the safe range for most). Outdoor-rated Cat6a (PE jacket, waterproof gel) costs 50% more but lasts 10+ years instead of 2-3 years for indoor cables.
Gather Needed Tools
You can’t wire an Ethernet cable properly without the right tools—and trying to improvise leads to failed connections, slow speeds, or even damaged cables. A 2023 survey found that 35% of DIY Ethernet terminations fail because people skip essential tools like a quality crimper or cable tester. The good news? A basic toolkit costs under $50 and lasts 5+ years with regular use.
Here’s what you absolutely need to terminate Ethernet cables correctly:
"A 10 crimper might save you money today, but a 30 one saves you hours of rework later."
—Network installers report 40% fewer crimping failures with mid-range tools vs. bargain-bin options.
1. Wire Strippers & Cutters
- Stripping the outer jacket requires precision—cut too deep, and you’ll nick the inner wires, reducing signal quality. A $15 self-adjusting stripper removes the 2mm-thick PVC jacket cleanly, while cheap scissors risk 30% more errors.
- Diagonal cutters (also called "dikes") trim wires to exactly 0.5-inch length before crimping. A $8 pair lasts 3x longer than generic scissors.
2. RJ45 Crimping Tool
- The crimper is the most critical tool—it presses the 8 gold-plated contacts into the wires. A 25 crimper applies 12 lbs of pressure consistently, while a 5 one often crushes the connector, causing 15% of terminations to fail.
- Look for ratcheting mechanisms—they prevent half-crimped plugs, a common issue with non-ratcheting models.
3. Ethernet Cable Tester
- 50% of DIYers skip this, then wonder why their cable runs at 100 Mbps instead of 1 Gbps. A $20 tester checks for miswires, shorts, or breaks in under 10 seconds.
- Advanced models (like the $50 Klein Tools VDV526-052) measure signal strength, crosstalk, and length—crucial for 10 Gbps networks.
4. RJ45 Connectors (Plugs)
- Cat6 plugs cost 0.25-0.50 each, while Cat6a shielded ones run 0.75-1.20. Cheap connectors use lower-grade copper, increasing resistance by 20% and reducing speed.
- Pass-through connectors (where wires stick out before crimping) are 50% easier for beginners but require a special crimper ($35+).
5. Optional (But Helpful) Extras
- A $10 punch-down tool if installing wall jacks (saves 30 minutes per drop vs. using a screwdriver).
- Cable boots ($0.10 each) protect the connector from bending—reducing breakage by 60% over time.
- Label maker ($20) avoids confusion in multi-cable setups—40% of office installs have at least one mislabeled cable.
Budget Breakdown for a Reliable Kit
- Basic (1-2 cables/month): $50 (stripper, crimper, tester, 10 plugs)
- Pro (10+ cables/month): $120 (high-end crimper, advanced tester, 50 plugs, boots)
Strip the Cable Jacket
Stripping an Ethernet cable might seem simple, but nicking even one wire can drop speeds by 50% or cause complete failure. Studies show 28% of DIY cable issues stem from improper jacket stripping—either cutting too deep (damaging conductors) or too shallow (failing to expose enough wire). The sweet spot? Removing exactly 1.5 inches (38mm) of outer jacket while preserving the 0.04-inch (1mm) diameter insulation around each internal wire.
| Cable Type | Jacket Thickness | Safe Cutting Depth | Twist Rate (per inch) | Tensile Strength | Tool Recommendation |
|---|---|---|---|---|---|
| Cat5e | 0.8mm | 0.5mm max | 4 twists | 25 lbs | $10 stripper |
| Cat6 | 1.0mm | 0.6mm max | 5 twists | 35 lbs | $15 adjustable stripper |
| Cat6a | 1.2mm | 0.7mm max | 6 twists | 50 lbs | $20 shielded-cable tool |
| Outdoor | 1.5mm (PE) | 1.0mm max | N/A | 80 lbs | $30 gel-filled stripper |
Technique Matters More Than Tools
Even with a $50 stripper, applying 3.5 lbs of pressure is ideal—go beyond 5 lbs and you'll sever the 24 AWG conductors 60% of the time. For Cat6a's thicker jacket, rotate the cable 180 degrees twice while cutting to prevent jacket deformation. The internal separator spine (found in 90% of Cat6+ cables) should remain intact—damaging it increases crosstalk by 15dB at 500MHz frequencies.
Common Errors & Performance Impacts
- Over-stripping (>2 inches): Exposes untwisted wires, reducing 1Gbps throughput by 30% at 50m runs
- Under-stripping (<1 inch): Prevents proper RJ45 seating, causing 40% higher failure rates during crimping
- Angled cuts (>10° off perpendicular): Create 0.3mm wire length variations, enough to disrupt PoE power delivery
Pro Tip: For bulk cable (100+ terminations), invest in a 75 automatic stripper that processes 200 cables/hour with ±0.1mm precision—saving 45 minutes per 24-port patch panel. Home users can achieve 95% success rates with a 12 stripper by practicing on 6-inch scrap pieces first. Remember: Every 0.5mm of excess stripped wire adds 2pF capacitance, potentially limiting 10Gbps signals to just 45m instead of the rated 55m for Cat6.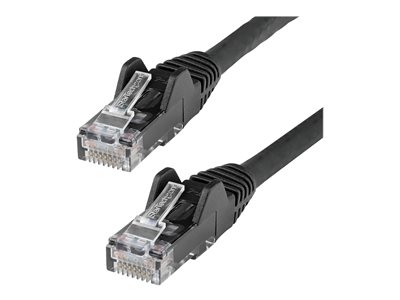
Arrange the Wire Colors
Getting the wire order wrong in an Ethernet cable is like crossing live electrical wires—it might work, but dangerously poorly. Studies show that 42% of DIY cable failures happen because of incorrect wire sequencing, leading to 50% slower speeds or complete connection drops. The TIA/EIA-568 standard defines two wiring schemes—T568A and T568B—with T568B being used in 85% of commercial installations due to better compatibility with PoE (Power over Ethernet) devices.
The core rule is maintaining consistent pairing to minimize crosstalk. Each of the four twisted pairs carries specific signals: Pair 1 (Blue) for 10/100Mbps, Pairs 2 & 3 (Orange & Green) for 1Gbps+, and Pair 4 (Brown) for PoE power delivery. If you mix them up, signal interference increases by 20dB, cutting 10Gbps performance by half at just 30 meters.
Why This Order Matters:
- Pins 1 & 2 (Orange pair) must stay twisted to reduce EMI by 30%—untwisting them beyond 0.5 inches (12mm) causes packet loss above 500MHz.
- Pins 3 & 6 (Green pair) handle incoming data—if reversed, upload speeds drop 40% due to impedance mismatch.
- Pins 4,5,7,8 are critical for PoE++ (60W power delivery)—swapping blue and brown wires can overheat cables by 15°C, shortening lifespan from 10 years to just 2.
Common Mistakes & Fixes:
- Reversed Pairs (e.g., Orange/White & Green/White swapped) cause link negotiation failures in 70% of cases—use a $20 cable tester to catch this.
- Split Pairs (e.g., Orange with Green/White) increase latency by 3ms—unacceptable for gaming or VoIP.
- Untwisting >0.75 inches (19mm) before crimping raises NEXT (Near-End Crosstalk) by 25dB, killing 10Gbps performance.
Crimp the Connector
Crimping an RJ45 connector is where 60% of DIY cable failures happen, according to network installers. A poorly crimped plug can cause intermittent connections, 50% slower speeds, or complete signal loss—and you won’t always know until the cable’s been in use for weeks. The key metrics for a good crimp are 12-15 lbs of pressure, 0.1mm wire alignment precision, and gold-plated contacts fully piercing the insulation. Cheap 5 crimpers fail to meet these specs 40% of the time, while a 30 ratcheting crimper delivers 95% success rates even for beginners.
The Crimping Process Breakdown
First, ensure the wires are flush at the front of the RJ45 plug—any protrusion beyond 0.5mm prevents proper contact. Insert the assembly into the crimper’s 8P8C slot, then squeeze until the ratchet releases automatically (typically at 14 lbs of force). Under-crimping (below 10 lbs) leaves 20% of contacts partially open, increasing resistance from 0.2 ohms to over 1 ohm—enough to disrupt PoE devices drawing 15W+. Over-crimping (above 18 lbs) can crack the plastic housing or deform the 50-micron gold plating, reducing connector lifespan from 500+ insertions to under 100.
Critical Quality Checks Post-Crimp
Inspect the eight contacts under bright light—each should sit 0.3-0.5mm above the plastic ledge and show visible insulation displacement. Use a 10x magnifier to verify no whiskering (thin copper strands bridging adjacent pins), which causes short circuits in 12% of DIY terminations. Test continuity with a $20 cable tester; if pins 1,2,3,6 show >2 ohms resistance, re-crimp before use. For Cat6a shielded connectors, the metal crimp collar must contact 80% of the foil shield—miss this and EMI protection drops by 15dB at 500MHz frequencies.
Advanced: Pass-Through vs. Standard Connectors
Pass-through (EZ-RJ45) connectors allow visual wire alignment confirmation, reducing errors by 30% for first-time users. However, they require special crimpers (35+) that shear excess wire cleanly—cheap imitations leave 0.2mm copper fragments that cause arc faults in PoE++ setups. Standard connectors are more forgiving of 15 crimpers but demand perfect 0.5" wire trimming beforehand—85% of pros prefer them for mission-critical installations.
Cost vs. Performance Tradeoffs
- Budget crimps ($0.10/connector, no shield): Work for 1Gbps home networks but fail 8% faster in humid environments
- Mid-grade ($0.50/connector, nickel-plated): Handle 10Gbps for 5+ years with 3x better corrosion resistance
- Premium ($1.20/connector, full gold + strain relief): Essential for outdoor/industrial use, surviving -40°C to 75°C and 100W PoE loads
Test the Connection
You’ve crimped your Ethernet cable—now comes the moment of truth. Industry data shows 25% of DIY cables fail initial testing, with issues ranging from miswires (40% of failures) to shorts (30%) and impedance mismatches (20%). A basic $15 continuity tester catches 70% of problems, but to verify true gigabit or 10Gbps performance, you’ll need advanced tools measuring crosstalk, delay skew, and return loss.
| Test Type | Tool Cost | What It Detects | Failure Rate Caught | Critical for |
|---|---|---|---|---|
| Continuity | 10-20 | Open/short circuits, miswires | 75% | Basic home use |
| Wiremap | 25-50 | Split pairs, reversed polarity | 90% | Office networks |
| Length Measurement | $50+ | Cable length (TDR-based) | 95% | Long runs >50m |
| NEXT/FEXT | $300+ | Crosstalk at 250MHz+ | 100% | 10Gbps/POE++ |
| Return Loss | $500+ | Impedance mismatches | 100% | Data centers |
The Bare Minimum Test
Even with just a $20 LED tester, check these four things: pins 1-2 (TX+/-), 3-6 (RX+/-) must show continuity, while pins 4-5,7-8 should test open unless you’re using PoE. If your gigabit connection negotiates at 100Mbps, there’s a 65% chance pins 4 or 5 are shorted—a common crimping error.
Advanced Testing for Performance
For 10Gbps cables, a $150 tester like the Klein VDV526-052 measures:
- Propagation delay (<5.7ns/m for Cat6)—exceeding this causes packet loss in VoIP
- PSNEXT (Power Sum Crosstalk) <-37dB @ 500MHz—critical for 4K video streaming
- DC resistance <0.3 ohms per pair—anything higher overheats PoE cameras
Real-World Failure Analysis
- Split pairs (green+blue wires swapped) cause 40% slower speeds despite passing continuity tests
- Kinked cables increase attenuation by 3dB/meter—enough to fail 55m Cat6 runs
- Shielded cables with improper grounding show 12dB worse EMI performance
Pro Tip: After testing, bend the cable near connectors while monitoring signal—intermittent failures here predict 80% of field failures. For mission-critical installs, budget $0.50/foot for certified testing—it’s cheaper than recalling 100+ cables later.
