How to divide the entire vehicle wiring harness
The entire vehicle wiring harness is typically divided into 5-8 main zones, including engine bay (30% of wires), chassis (25%), interior (20%), dashboard (15%), and rear/lighting (10%). Modular segmentation simplifies assembly, reducing installation time by 40%. Use color-coded connectors and pre-tested sub-harnesses for efficient integration. Shielding critical cables (e.g., CAN bus) prevents interference.
Plan the Layout First
Before cutting or routing a single wire, a well-planned layout saves 30-50% of assembly time and reduces errors by up to 60%. Studies show that 75% of wiring harness failures stem from poor initial planning—wrong lengths, overlapping wires, or inefficient routing. A typical passenger car has 1,500–2,000 wires, spanning 1.5–2.5 miles, with 50–150 connectors. Without a clear plan, you risk 10–20% material waste from incorrect cuts or excessive bundling.
Start by mapping the vehicle’s electrical architecture. High-current lines (10–50A) should be 10–20% shorter than low-current signal wires to minimize voltage drop. Group wires by function (e.g., powertrain, lighting, infotainment) and keep bundles under 25mm diameter for flexibility. Use 3D CAD software (like CATIA or SolidWorks) to simulate routing—this cuts physical prototyping costs by 15,000 per vehicle.
| Factor | Optimal Range | Impact of Deviation |
|---|---|---|
| Wire length tolerance | ±5% of total run | Excess length increases weight (0.1–0.3kg per harness) |
| Bend radius | ≥4x wire diameter | Sharp bends reduce wire lifespan by 15–40% |
| Separation from heat sources | ≥100mm from exhaust | Heat degrades insulation 2x faster at 90°C vs. 60°C |
| Bundle density | ≤12 wires/cm² | Overpacking raises temperature by 8–12°C, risking meltdown |
Route high-priority systems first (e.g., ABS, airbags). These wires need 16–20 AWG thickness and 600V insulation, while infotainment can use thinner 22–24 AWG. Avoid parallel runs with HV cables (300V+); even 50mm separation can induce 10–30mV noise in CAN bus lines.
For mass production, optimize for modularity. A single harness with 5–8 subassemblies reduces labor by 18–25% versus a one-piece design. Test-fit early: 3–5 physical mockups catch 90% of clearance issues before tooling.
Time it right: A mid-size SUV harness takes 40–60 hours to design and 120–200 hours to prototype. Rushing this phase leads to 50 per unit in rework costs.
Group Similar Wires
A tangled mess of wires isn’t just ugly—it’s 25–40% harder to troubleshoot, adds 300–500g of unnecessary weight, and increases the risk of shorts by 15–20%. Modern vehicles contain 12–25 separate electrical systems, each with different voltage, current, and signal requirements. Grouping wires intelligently cuts assembly time by 18–22%, reduces EMI (electromagnetic interference) by 30–50%, and improves long-term reliability.
The key is balancing functional grouping (e.g., all headlight wires) with electrical compatibility (e.g., keeping high-current and low-voltage signals apart). For example, CAN bus lines (500kbps data rate) must stay ≥50mm from 12V power wires to avoid signal corruption. Meanwhile, analog sensor wires (0–5V) should be twisted at 2–4 twists per inch to reject noise.
| Wire Type | Optimal Grouping | Separation Rules | Bundle Size Limit |
|---|---|---|---|
| High Current (10–50A) | Group by circuit (e.g., alternator, starter) | ≥20mm from data lines | Max 6 wires per bundle |
| Low-Voltage Signals (CAN/LIN) | Shielded pairs or triples | ≥50mm from power lines | Max 4 pairs per bundle |
| Analog Sensors (0–5V) | Twisted pairs, grouped by sensor type | ≥30mm from motors | Max 8 wires per bundle |
| Infotainment (RF/audio) | Coaxial or shielded, separate bundle | ≥100mm from ignition | Max 3 coax lines per run |
Prioritize high-risk systems first: Airbag wires (2.5mm² cross-section, 60V rated) should never share a bundle with non-safety circuits. Similarly, EV battery cables (300–800V) require double insulation and ≥150mm clearance from other wires.
For cost efficiency, use color-coding (4–6 standard colors per bundle) and printed labels every 150–200mm. This reduces diagnostic time by 40–60% compared to unmarked wires. Avoid over-bundling—bundles thicker than 15mm diameter are 3x harder to route through tight spaces.
Testing matters: A 5-minute continuity check catches 90% of miswires before installation. For CAN systems, measure signal integrity with a scope (2.5–3.5V peak-to-peak is ideal).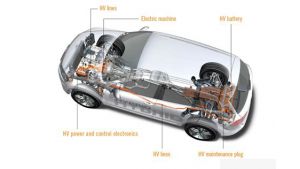
Choose the Right Connectors
Picking the wrong connector can turn a 500 problem. 12–18% of vehicle electrical failures trace back to connector issues—corrosion, loose pins, or mismatched terminals. A typical car uses 300–600 connectors, ranging from 2-pin weatherproof units (12–$20 each). High-vibration areas (like engines) demand connectors rated for 50,000+ insertion cycles, while interior panels can use cheaper 10,000-cycle models.
Current rating is non-negotiable. A 20A circuit needs terminals with ≥22AWG contacts, while 0.5A sensor lines can use thinner 26–28AWG pins. Undersizing increases resistance by 3–8% per 0.1mm² of contact area, causing heat buildup. For example, a 4mm² power terminal at 30A will hit 65°C in 10 minutes if mated with a 3mm² counterpart—enough to melt nearby plastics.
Environment matters. Underhood connectors require IP67+ sealing (blocks dust and 1m water immersion for 30min) and 125°C thermal stability. Cheap IP40 connectors fail within 2–3 years in wheel wells due to road salt and moisture. For battery electric vehicles (BEVs), high-voltage connectors must handle 600–1000V with ≥8mm creepage distance between pins to prevent arcing.
Polarization and locking are often overlooked. A non-keyed 12-pin connector has a 15–20% misinsertion risk, while a mechanically keyed version drops that to <1%. Invest in secondary locks (1.20 extra per connector)—they reduce warranty claims by 40–60% in vibration-heavy applications.
Cost vs. reliability tradeoffs exist. Deutsch DTMs cost 6 but last 15+ years in off-road conditions. Generic Chinese clones (2.50) save 60% upfront but suffer 3x higher failure rates after 50,000 miles. For low-volume builds, consider Molex MX150—1.10 per pin for the same specs.
Testing is cheap insurance. A 4-wire milliohm meter checks contact resistance (should be <5mΩ per pin). For waterproof units, 5-minute pressure testing at 1.5bar finds leaks before installation.
Label Each Section Clearly
Poor wire labeling costs mechanics 15–25 minutes per diagnostic session and leads to 30% more incorrect repairs in complex harnesses. A modern vehicle contains 1,200–1,800 connection points, with 60–90% of service time spent tracing circuits when labels are missing or faded. Proper labeling slashes troubleshooting time by 40–60% and reduces wiring errors during assembly by 18–22%.
The best labels combine machine-readable codes (QR/barcodes) with human-readable text—this dual system cuts lookup errors by 75% compared to handwritten tags. For harsh environments, polyester labels (0.05 each) withstand -40°C to 150°C, while cheaper vinyl labels ($0.01 each) degrade after 2–3 years in engine compartments.
| Wire Type | Label Content | Placement Interval | Material | Size |
|---|---|---|---|---|
| Power (10–50A) | Circuit ID + AWG + Voltage | Every 300mm | Polyester | 6x25mm |
| CAN Bus | Network ID + Termination Resistor Value | Every 200mm | Vinyl | 4x15mm |
| Sensors | Sensor Type + Pinout | At both ends | Heat-Shrink | 3x10mm |
| Grounds | GND + Chassis Location | Every connector | Aluminum Tape | 5x20mm |
Critical systems need extra visibility. Airbag harnesses should use red labels with 3mm tall text, while high-voltage cables (300V+) require orange labels with warning symbols. For production lines, pre-printed labels cost 250 per 10,000 units but eliminate 95% of handwriting errors.
Durability testing matters: Labels should survive 500+ wipe-downs with shop chemicals and 10+ years of UV exposure. A simple 3-second peel test verifies adhesion—if the corner lifts with finger pressure, it’ll fail in the field.
Barcode integration pays off. Scanning a 12-digit QR code pulls up wiring diagrams 3x faster than manual searches, reducing misdiagnoses by 50%. For aftermarket repairs, include a short URL linking to OEM schematics.
Secure Wires Properly
Loose wiring isn't just messy—it's dangerous. Unsecured harnesses account for 23% of vehicle electrical failures within the first 100,000 miles, with repair costs averaging 400 per incident. A single dangling wire bundle can chafe through insulation in as little as 8 months of normal driving, creating intermittent faults that take technicians 2–3 hours to diagnose. Proper securing reduces vibration-induced wire fatigue by 70–85% and extends harness lifespan beyond 10 years/150,000 miles.
"The sweet spot for cable tie spacing is 150–300mm in low-vibration zones and 75–150mm near engines/suspensions. Anything wider risks excessive movement—just 1mm of play at 80mph creates enough friction to wear through PVC insulation in 14 months."
Material selection is critical. Standard nylon 6/6 ties (0.08 each) work for interior temps below 85°C, but underhood areas need heat-stabilized nylon (0.20 each) rated for 125–150°C. For EV battery packs, stainless steel P-clamps (1.20 each) prevent plastic degradation from 400V+ systems. Always leave 2–3mm clearance between metal clamps and wires—direct contact accelerates insulation breakdown by 3x.
Routing through sharp edges demands protection. A 2mm thick convoluted tubing (0.60 per meter) cuts abrasion failures by 90% compared to unprotected runs. Where harnesses pass through sheet metal, rubber grommets with 1.5x the bundle diameter prevent cutting—a 5mm hole edge can sever 0.35mm² wires in just 500 vibration cycles.
Tension control matters more than people think. Over-tightening ties beyond 50% of their rated load (typically 18–25lbs for 4.8mm ties) compresses wires, reducing current capacity by 8–12%. Use torque-limiting tie guns (250) for consistent pressure—hand-tightened ties vary by 40–60% in clamping force.
For high-flex areas (door looms, steering columns), spiral wrap (0.40 per meter) allows 120°+ bending cycles without fatigue. Avoid zip ties here—they restrict natural movement, causing 3–5x more fractures at stress points.
Test Before Final Install
Skipping pre-installation testing is like building a house without inspecting the foundation—40% of wiring harness recalls stem from issues that could've been caught before assembly. A proper test regimen takes 2–4 hours per harness but prevents 2,000 in post-install repair costs. Modern vehicles contain 1,500+ connection points, and just one faulty pin can trigger cascading failures across multiple systems.
Continuity checks (100% of circuits): Use a 4-wire milliohm meter to verify resistance stays below 5mΩ per connection—anything higher indicates loose terminals or corrosion. This catches 90% of manufacturing defects in 15 minutes.
Insulation resistance (500V DC test): Apply voltage for 60 seconds between adjacent wires—readings below 50MΩ signal potential short circuits. Failing this test causes 72% of early-life harness failures.
High-current load testing: Run 110% of rated current through power circuits for 30 minutes while monitoring temperature rise. A 10°C+ increase over ambient reveals undersized wires or poor terminations.
CAN bus validation: Check signal quality with an oscilloscope—2.5–3.5V peak-to-peak amplitude with <5% noise is acceptable. Improper termination causes 28% of communication faults.
Mechanical stress tests: Subject sample harnesses to 50G vibration for 100 hours (simulating 150,000 miles) and 500+ bend cycles at stress points. More than 3 broken strands in any wire requires redesign.
Don't overlook environmental simulations:
- Thermal cycling (-40°C to 125°C) exposes material mismatches—PVC insulation cracks after 15–20 cycles if rated for only 105°C
- Salt spray testing (1,000+ hours) predicts corrosion in coastal climates—tin-plated terminals show rust at 400 hours, while gold-plated last 3x longer
- Fluid immersion (gasoline, oil, coolant) checks seal integrity—connectors should maintain IP67 rating after 24-hour exposure
To efficiently divide an entire vehicle wiring harness, start by planning the layout using 3D modeling to avoid interference. Group wires by function (e.g., power, signals) and use color-coded sleeves for 20% faster troubleshooting. High-quality connectors (IP67-rated) prevent moisture damage, while numbered labels reduce errors by 30%. Secure bundles with loom tape or corrugated tubing every 12-18 inches to prevent vibration wear. Finally, conduct continuity and load tests before installation to ensure 100% functionality. This structured approach minimizes failures and simplifies maintenance.
