How Long Does a Harness Cable Assembly Process Take
Harness cable assembly time varies by complexity: simple, single-connector designs take 2–4 hours (manual assembly), while multi-node systems with automated crimping/testing require 10–15 hours. Design revisions or custom shielding add 15–20% time due to rework.
Key Steps in Assembly
The time it takes to assemble a harness cable can vary dramatically, from under 30 minutes for a simple 5-conductor cable to over 8 hours for a complex, 100+ wire assembly for industrial machinery. This variance isn't random; it's dictated by a series of precise, physical steps where each action adds time. Understanding this process is key to estimating labor costs and production schedules accurately. You're not just plugging wires together; you're building a critical component where a single misrouted wire can lead to a 100% failure rate in final testing, necessitating costly rework.
Using an automated machine, an operator can process several hundred wires per hour, cutting them to precise lengths with an accuracy of ±2 mm. Manual stripping with a basic tool takes roughly 15 to 20 seconds per wire end, while an automated stripper can process an end in under 5 seconds. For a harness with 50 wires and 100 ends, manual stripping alone would consume 25 to 33 minutes of labor. The next critical phase is terminal crimping. A skilled technician using a calibrated pneumatic press can attach a terminal in about 6-8 seconds. However, this time can double if the wire gauge is unusual or if the operator must constantly change tooling. For our 50-wire harness, that's another 5 to 7 minutes of focused work.
A significant time sink that is often underestimated is the routing and insertion of wires into the connector housings or onto the pin-out board. This is a meticulous, manual process where the technician follows a schematic to ensure each wire lands in its correct cavity. Even for an experienced assembler, inserting 24 wires into a high-density connector can take 10 to 15 minutes to avoid cross-insertion, which would cause a failure later.
A basic continuity check for a short harness might take 2 minutes. However, a full functional test using a custom test fixture that applies 5 volts DC and checks for expected current draw and signal integrity on all 50 circuits could easily take 5 to 8 minutes per harness. This means testing can often account for 10-15% of the total assembly time.
Cable Type and Time Needed
A simple unshielded 4-conductor cable for an internal device might take under 25 minutes to complete, while a complex shielded and jacketed multi-pair cable for industrial automation can easily require over 3 hours of hands-on labor. This isn't just a minor difference; it's a 400% to 700% increase in time driven by the physical properties and required handling of each wire type.
|
Cable Type |
Key Specifications |
Avg. Assembly Time (min.) |
|---|---|---|
|
Unshielded Multi-Conductor |
4-6 conductors, 22-24 AWG |
20 - 30 |
|
Shielded Multi-Conductor |
12-16 conductors, foil + drain wire |
75 - 110 |
|
Multi-Conductor with Overall Braid |
8 conductors, 20 AWG, 85% coverage |
120 - 180 |
|
Coaxial (RF) |
RG-58, requires precise stripping |
15 - 25 (per connector) |
|
Twisted Pair (Data) |
Cat6A, 23 AWG, shielded |
8 - 12 (per RJ45 plug) |
A cable with a simple foil shield and a single drain wire adds approximately 15 to 20 minutes to the process for careful preparation and termination. However, a cable featuring a braided copper shield with 85% coverage is a different story. Working with the braid requires meticulously pushing it back, twisting it into a pigtail, and often soldering it to a ground terminator, a process that can alone take 10 to 15 minutes per cable end. For a 2-meter cable with connectors on both ends, you're adding 20 to 30 minutes just for shield termination.
Crimping a connector onto a standard 22 AWG wire is a swift, one-step process taking 6-8 seconds. Conversely, dealing with a thicker 12 AWG power wire requires selecting the correct, larger tooling, applying significantly more force, and often performing a two-step crimp for the conductor and insulation, consuming 18-25 seconds per crimp. When you multiply this by 24 terminations in a large harness, the delta in crimping time alone can be 5 to 7 minutes.
A standard PVC jacket is straightforward to strip with automatic tools set to a specific blade depth of 0.3 mm. However, a thermoplastic elastomer (TPE) or similar ruggedized jacket can be gummy and difficult to cut cleanly. Technicians often have to make multiple gentle passes with a stripping blade set to a 0.2 mm depth to avoid nicking the underlying conductors, increasing the stripping time per end from 3 seconds to 10 seconds. For a harness with 50 wire ends, this subtle material difference adds almost 6 minutes of labor.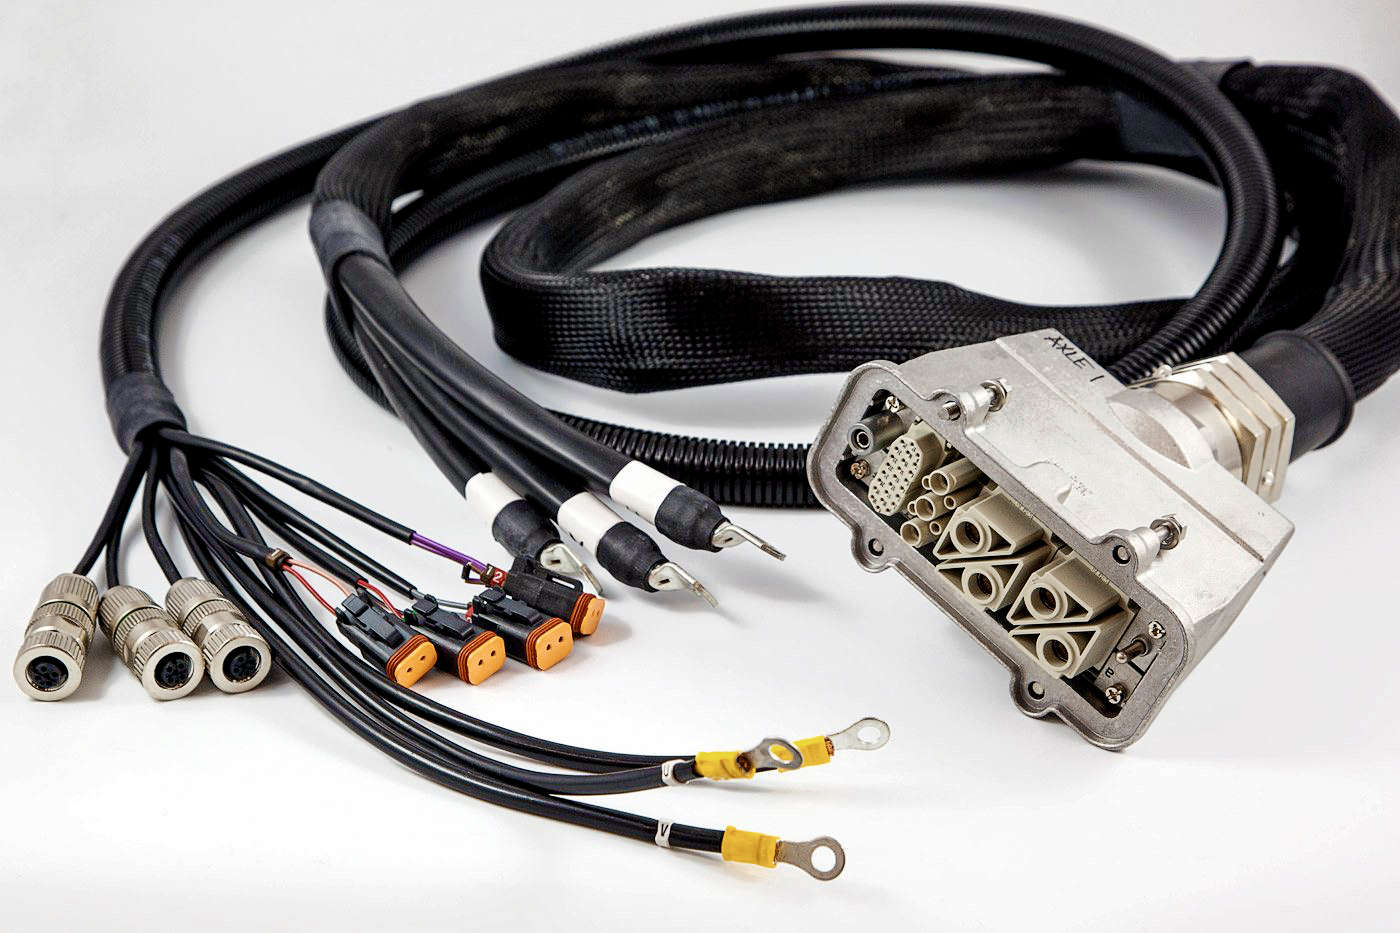
Tool and Machine Speeds
An operator using a manual wire stripper and a hand crimper might take 45 minutes to assemble a 20-conductor harness. That same harness, processed with a $5,000 benchtop stripping and crimping machine, could be completed in under 12 minutes. This 73% reduction in hands-on time is the core reason manufacturers invest in equipment, as the ROI is calculated in saved wages and increased daily output.
|
Tool Type |
Function |
Avg. Speed / Cycle Time |
Relative Cost ($) |
|---|---|---|---|
|
Manual Stripper |
Strip wire end |
15 - 20 seconds |
10 - 50 |
|
Automatic Strip & Cut Machine |
Strip/cut 100 wires |
90 - 120 seconds (for 100 wires) |
3,000 - 8,000 |
|
Hand Crimper |
Attach terminal |
10 - 15 seconds |
50 - 200 |
|
Pneumatic Crimp Press |
Attach terminal |
4 - 6 seconds |
800 - 2,500 |
|
Ultrasonic Welder |
Splice wires |
8 - 12 seconds |
15,000 - 30,000 |
|
Automated Test Station |
Electrical validation |
30 - 60 seconds (per harness) |
10,000 - 25,000 |
These devices can process a 500-wire reel in a single batch, cutting all wires to a precise 250 mm length ± 0.5 mm and stripping both ends in roughly 90 to 120 seconds. This same task done manually would take a single operator over 4 hours, representing a 96% reduction in processing time. The machine's consistency also slashes the error rate for nicked conductors from a manual stripping average of 3% down to under 0.1%, which directly reduces costly rework and material waste.
A technician using a hand-held crimper must position the terminal, apply significant physical force, and visually inspect each crimp, averaging 10 to 15 seconds per connection. A foot-pedal operated pneumatic crimp press eliminates the physical strain and standardizes the force, dropping the cycle time to a consistent 4 to 6 seconds. For a 100-terminal harness, this tool upgrade alone saves 10 to 15 minutes of assembly time. High-volume shops use fully automated crimping machines that feed, crimp, and cut at speeds exceeding 2,000 terminations per hour.
Ultrasonic welding, used to splice multiple wires without the bulk of a connector, completes a consistent, strong bond in 8 to 12 seconds. Manually soldering and insulating a similar splice would take 60 to 90 seconds, making the welder 6 to 7 times faster for this operation. Similarly, a dedicated continuity and hipot test station can validate a complex 50-pin harness for shorts, opens, and insulation breakdown at 1,000 volts DC in under 60 seconds. A technician with a multimeter performing the same checks would need 5 to 8 minutes, with a higher potential for human error.
Worker Experience Level
Data from production floors shows a novice worker with under 6 months of experience may take 180 minutes to assemble a 50-wire harness, with a first-pass failure rate of 15% during electrical testing. A seasoned technician with over 5 years of experience will complete the same harness in under 90 minutes with a failure rate below 1%. This 100% time difference directly translates to a doubling of labor cost for the same physical product, making investment in training and retention a critical financial decision, not just an operational one.
The gap in proficiency manifests in several key areas that compound over the length of an assembly:
-
Terminal Crimping: A novice might misalign a terminal in the crimp die, apply insufficient force, or use the wrong die for the wire gauge, resulting in a reject rate of 1 in 15 crimps that must be cut off and redone. This rework adds 3-4 minutes per defect. An expert performs a perfect crimp every 6 seconds, with a reject rate of less than 1 in 500.
-
Reading Schematics: A new assembler will constantly stop to re-check the pin-out diagram, adding 20-30 minutes of cognitive load and verification time to a complex harness. An experienced tech has an almost mental map of the layout, following the schematic with 90% fewer pauses, shaving that time down to under 5 minutes.
-
Wire Routing: The physical organization of wires within a loom or sleeve is where artistry meets efficiency. A beginner will create a tangled path, making it difficult to insert wires into the backshell, a struggle that can consume 15 extra minutes. A veteran pre-folds and routes wires in the optimal sequence, achieving a 30% denser and more logical bundle in half the time.
A novice might incorrectly strip a 24 AWG wire, cutting 30% of the strands and rendering a $2.50 cable unusable, with this error occurring on roughly 5% of their strips. An expert's precision stripping preserves 99.9% of conductors, virtually eliminating this waste.
Furthermore, the expert’s deep understanding of tension and strain relief ensures that a cable assembly can withstand 5,000 flex cycles instead of failing prematurely at 1,000 cycles, directly impacting the product's warranty costs and customer satisfaction. The time to proficiency is measurable; it typically takes 500 to 600 hours of hands-on assembly for a worker to reach a baseline of competence and over 2,000 hours to achieve the speed and failure rates of a true expert. This is why production managers often pair new hires with mentors for their first 160 hours, a investment that reduces the overall training period by 25% and prevents costly mistakes on customer orders.
Quality Checking Duration
A basic continuity test on a simple 10-wire cable might only take 2 minutes, but a full electrical and mechanical validation on a complex 120-wire avionics harness can require over 45 minutes of meticulous checking. This phase isn't just about finding faults; it's a proactive measure that prevents a 50,000 in downstream system damage.
The quality check is a multi-stage process, with each step adding a fixed amount of time to the total.
-
Visual and Mechanical Inspection: This first line of defense takes 3 to 5 minutes for a simple harness but can extend to 20 minutes for a complex one. Inspectors meticulously verify that every crimp terminal is properly seated in its connector housing with an audible 'click', check that no copper strands are protruding, and ensure the strain relief is correctly clamped with a torque value of 5-7 inch-pounds. They also confirm that all cable ties are spaced at 50 mm intervals and that the routing matches the engineering schematic exactly.
-
Electrical Functionality Test (Continuity & HiPot): This is where the most time is spent. A basic continuity test for shorts and opens on a 50-circuit harness using a manual probing method can take 8-12 minutes. However, when you introduce a 1,500 Volt AC HiPot (dielectric withstand) test to check for insulation breaches, the time per harness increases by another 3-5 minutes as the voltage must be ramped up and held for a 60-second dwell time. Using a $20,000 automated test system with a custom mating connector can slash this total electrical test time down to under 90 seconds by checking all circuits simultaneously, but this is only cost-effective for production runs in the thousands of units.
Locating the root cause of a single short circuit or open connection can take a technician anywhere from 2 minutes to over 30 minutes if the fault is intermittent or buried deep within a tightly loomed bundle. Each discovered defect necessitates rework—cutting zip ties, extracting the faulty wire, repairing it, and reassembling the bundle. A single repair can easily add 15 to 20 minutes of unplanned labor. This is why the first-pass yield from the assembly bench is so critical; a 95% yield means only 1 in 20 harnesses needs lengthy diagnostic time, while a 80% yield means diagnostics and rework consume an unsustainable amount of productive capacity, effectively doubling the QC time allocation.
Handling Special Cases
A typical 100-wire control panel harness might take 8 hours to build and test. However, introducing a single special case—like a braided shielding requirement or a custom over-molded connector—can add 2 to 4 hours of specialized labor. These are not minor adjustments; they are complex, value-added processes that demand unique skills, uncommon materials, and significantly more time, often accounting for a 25% to 50% premium on the final unit cost.
|
Special Case |
Key Specifications |
Added Time per Unit |
Primary Time Driver |
|---|---|---|---|
|
Custom Shielding |
Braid or double-layer foil |
+45 - 75 min |
Hand-braiding, solder grounding |
|
Over-Molded Connectors |
Custom tooling, 2-shot molding |
+120 - 180 min |
Mold setup, curing time |
|
Potting/Conformal Coating |
Epoxy or silicone application |
+30 - 50 min |
Mixing, pouring, curing |
|
Extreme Environment |
Teflon jacket, high-temp terminals |
+20 - 40 min |
Difficult stripping, special crimps |
|
Custom Labeling |
Heat-shrink labels, laser etching |
+15 - 25 min |
Application/etching per wire |
Which itself can take 4-6 weeks of lead time. The assembly process then involves meticulously positioning the wires within the mold cavity, injecting liquid silicone or thermoplastic polyurethane at a specific pressure of 40-60 psi, and then allowing the material to cure for 60 to 90 minutes at a controlled temperature of 80°C. This curing time is largely passive, but it occupies workholding fixtures and blocks the assembly from moving to the next station, effectively adding 2 to 3 hours of total cycle time per unit.
Applying a potting compound to a connector backshell to waterproof it involves a precise 1:1 mix of a two-part epoxy, a careful pour to fill 95% of the cavity volume, and a 24-hour full cure time at room temperature before the unit can be handled for testing. While the active labor time is only 30 minutes, the calendar time for the project extends by a full day. Similarly, working with Teflon (FEP/PTFE) insulated wires is a common time adder. This material is notoriously difficult to strip cleanly without nicking the conductor; technicians must use specialized heated stripping blades set to a precise 320°C and often make multiple attempts, increasing the stripping time per wire end from 3 seconds to 20 seconds. For a 50-wire harness, this single material change adds over 14 minutes of labor just in preparation. These cases are not exceptions; they are commitments to higher reliability that are directly reflected in the clock time of your assemblers.
Harness cable assembly timelines hinge on multiple dynamic factors. Basic steps (stripping, crimping) take ~2-5 minutes per wire; finer cables (e.g., 28AWG) lag thicker ones (12AWG) by ~30% due to fragility. Automated tools (CNC strippers) process 200-300 wires/hour vs. 50-80 for manual tools. Experienced workers shave 40% off novice times, while QC adds 15-20% (30-45 mins for 500-unit batches). Special tasks (shield welding) extend timelines by 20-30%.
