How to Inspect a Wire Harness Assembly | A 4-Point Checklist
Inspect wire harness assemblies by visually checking for frays/cracks (≤3 per inch with 10x magnifier), testing terminal crimps with a 50N pull test, verifying continuity at <0.5Ω via multimeter, and validating insulation with 300V megohmmeter (≥100MΩ resistance).
Check for Physical Damage
Industry studies of electrical failures in machinery indicate that up to 35% of malfunctions originate from physical damage to the wire harness that went unnoticed. This damage often occurs during the 3-5 year service life of a typical harness due to vibration, abrasion, or improper handling. A simple 5-minute visual inspection can prevent the average $1,200 repair bill associated with tracing and fixing subsequent electrical faults, not including the 12-24 hours of machine downtime.
Use a bright 60-watt equivalent LED light source held at a 30-45 degree angle to the harness to highlight surface imperfections. You are looking for a specific set of defects that compromise the harness's integrity. Pay closest attention to the first 8-10 inches from connectors and any area where the harness passes through a metal frame or bulkhead, as ~70% of abrasions occur at these stress points.
A common finding is a section that feels softer or more pliable, which often indicates internal broken strands and a 50-60% reduction in current-carrying capacity. A harness with a 2.0 mm² cross-section (common for 10-15 amp circuits) suffering from this damage may now only safely carry 4-6 amps before overheating becomes a risk.
The most critical yet overlooked step is flexing the harness near connectors. Gently bend the wire bundle in a U-shape. If any cracking sound is heard or if fine, hair-like copper strands (typically 0.08-0.15 mm in diameter) become visible at the stress point, the insulation has become brittle and requires immediate replacement. This brittleness often occurs after prolonged exposure to engine bay temperatures exceeding 105°C.
Exposure to ethylene glycol-based antifreeze often causes PVC insulation to become sticky and swell, increasing its diameter by ~10%. Conversely, prolonged contact with petroleum-based oils can cause certain insulation types to harden and crack within 6-12 months of constant contact.
| Type of Damage | Common Location | Immediate Risk | Long-Term Consequence |
|---|---|---|---|
| Abrasion (Loom worn >50% through) | Against unpainted metal brackets | Short Circuit | Complete wire fracture |
| Insulation Crack (>2 mm long) | Near connector boots | Current Leakage (5-15 mA) | Corrosion of terminal pins |
| Crushed Conductor (Diameter reduced >30%) | Under clamp or tie-wrap | Increased Resistance (>5 ohms/m) | Localized overheating |
| Chemical Swelling | Lower engine area | Loss of Dielectric Strength | Insulation breakdown under load |
A reading that is >0.5 Ohms higher than the specification for that length and gauge of wire confirms degradation, even if the damage is not yet visible. This quantitative data point is what separates a guess from a definitive diagnosis, allowing you to replace only what is necessary and restore 100% reliability.
Verify Connector Engagement
Data from automotive and industrial equipment repair logs show that approximately 25% of all electrical gremlins are traced back to poor connector engagement. A partially connected multi-pin connector can generate >5 ohms of additional resistance at each terminal, leading to a voltage drop of over 1.5 volts on a 12-volt system under load. This often results in sensors sending erratic data, with values deviating by ±15% from actual readings, causing controllers to execute faulty commands. The average repair for such an issue, once diagnosed, involves ~1.5 hours of labor at a shop rate of $120/hour, making a 30-second push-test during assembly or maintenance a tremendous cost saver.
| Inspection Point | Tool Needed | Acceptable Standard | Failure Risk |
|---|---|---|---|
| Audible Click | None | A clear, crisp sound is mandatory | >90% probability of vibration-induced disconnect |
| Locking Tab Position | Visual Check | Must be flush with connector housing | Unlocked |
| Secondary Lock | Finger Pressure | Must be fully seated and not lift >0.5mm | Individual terminals can back out |
| Connector Alignment | Visual Check | Housing seams must be even and parallel | Pins are misaligned and stressed |
Most modern connectors require 7-10 lbs of force to fully seat and engage the primary lock. You should hear a definitive, sharp clicking sound. If the sound is muffled or absent, the locking mechanism has not engaged. In a high-vibration environment like an engine compartment vibrating at ~100 Hz, an unclicked connector has a >70% chance of working loose within 500 hours of operation.
A tab that is even 1 mm proud indicates incomplete mating. Gently tug on the connector body with a force of ~2-3 lbs; there should be zero movement between the connector halves. Any movement at all signifies a poor mechanical fit, which will lead to electrical arcing. Arcing creates localized heat spots that can reach >300°C, melting plastic housing and oxidizing copper terminals, which increases their resistance by 200% or more.
Many connectors feature a secondary locking mechanism, usually a red or orange slider or latch. This device is not a backup for the primary lock; it is a strain relief and terminal position assurance (TPA) device. Its sole function is to prevent individual metal terminals from loosening and retreating back into the connector cavity. With your fingers, apply firm pressure to ensure this secondary lock is in its final position. If it can be moved more than 0.5 mm, it is not fully engaged. A poorly seated TPA allows terminals to back out by ~0.1-0.3 mm per 1000 cycles of vibration, breaking electrical contact.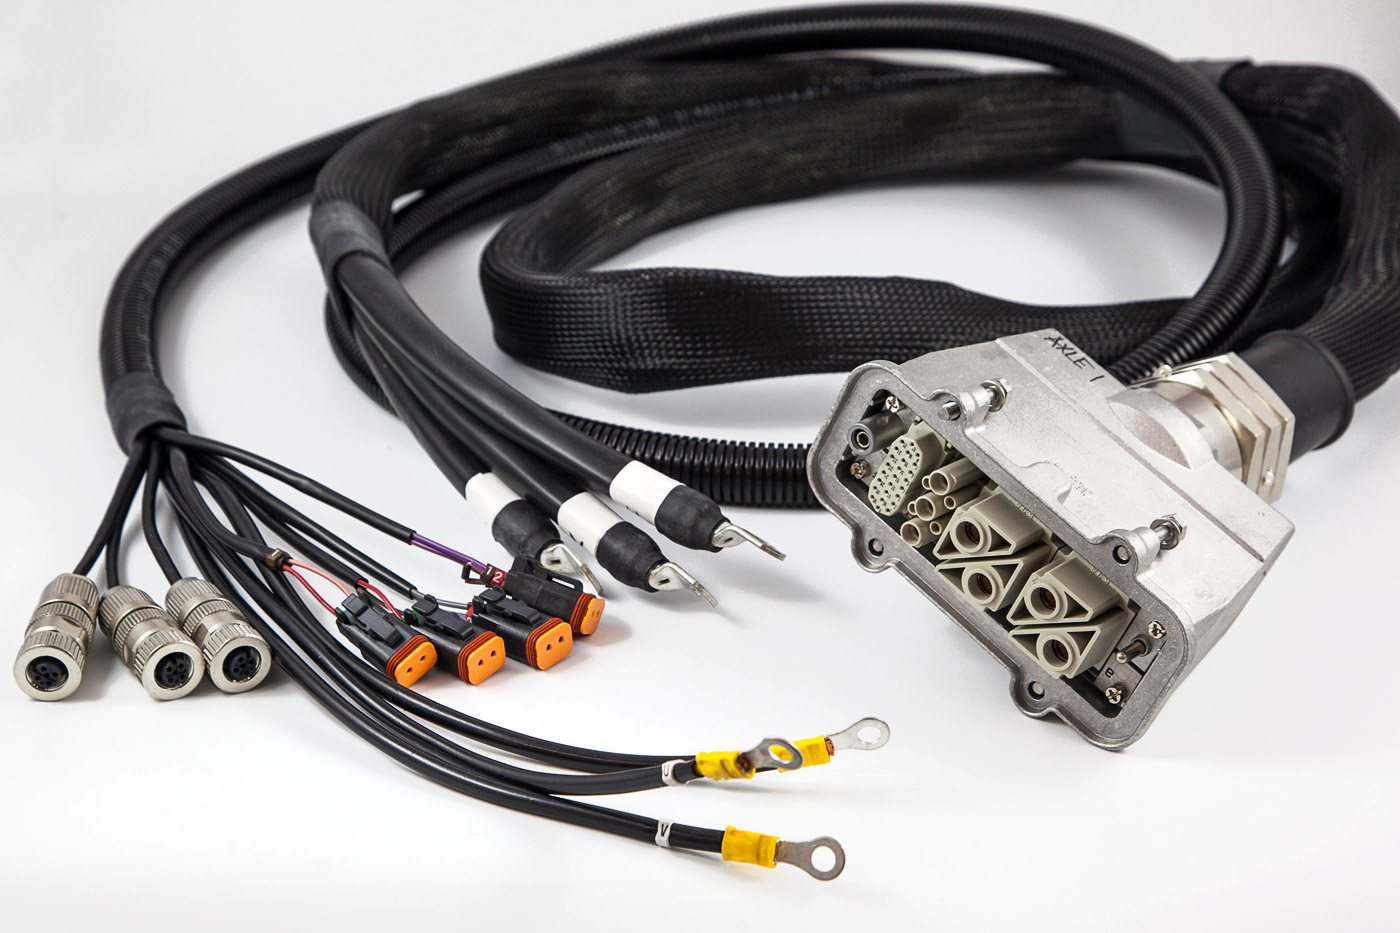
Inspect Wire Routing
Studies on machine downtime show that nearly 20% of wire harness failures are caused by incorrect installation pathing, leading to >$800 in average unnecessary repair costs. The primary culprit is abrasion: a harness resting against a sharp, unpainted metal edge can wear through its protective loom at a rate of ~0.5 mm per 1,000 hours of operation in high-vibration environments. This often results in an intermittent short circuit that is notoriously difficult to diagnose, consuming 3-5 hours of troubleshooting time. A simple 4-minute visual routing check during installation prevents this, ensuring the harness operates reliably for its full 7-10 year service life.
The goal is to ensure the harness path avoids all potential hazards. Your inspection should focus on a few critical zones where mistakes are most common.
-
Maintain Minimum Clearance: Keep wire harnesses at least 50 mm away from hot components like exhaust manifolds. Sustained temperatures above 105°C will rapidly degrade most PVC insulation, causing it to become brittle and crack within 6 months. Similarly, maintain a 25 mm minimum gap from moving parts like throttle linkages or seat tracks to prevent snagging and abrasion.
-
Avoid Sharp Edges and Bushings: Any point where the harness passes through a metal panel must use a dedicated grommet. The hole diameter should be no more than 2 mm larger than the grommet's outer diameter. A common error is letting the harness directly contact a drilled metal hole, which acts like a saw blade. Vibration can wear through the wire insulation in under 300 hours, leading to a short to ground. For existing bushings, inspect for a >30% compression of the rubber; over-compression stresses the wires inside.
-
Secure with Proper Spacing: Use nylon tie-wraps or OEM clamps to secure the harness every 150-200 mm along its run. This prevents excessive movement that leads to fatigue. However, do not overtighten. A tie-wrap tightened to >20 lbs of force can crush the inner wires, reducing their diameter by 15% and their current-carrying capacity by over 35%. You should be able to rotate the tie-wrap on the harness with moderate finger pressure.
-
Ensure Correct Bend Radius: Never bend a wire bundle tighter than 10 times its diameter. For a harness that is 15 mm thick, the absolute minimum bend radius is 150 mm. A tighter bend stresses copper strands, causing micro-fractures that increase electrical resistance by 2-3 ohms and lead to failure. This is especially critical near connectors.
Test Electrical Function
Up to 15% of harnesses that look perfect have hidden flaws like corroded terminals or broken strands inside the insulation. These issues manifest as excessive resistance, causing a voltage drop >0.5V under a 5-amp load, which can lead to sensors deviating by ±8% from their calibrated output. This error margin is enough to cause a control system to make faulty decisions. A full electrical validation takes under 10 minutes with a basic multimeter but can prevent the average $1,500 diagnostic tear-down to locate an elusive intermittent fault.
Set your multimeter to the ohms setting and zero the leads by touching them together; a reading of <0.2 ohms is acceptable for the leads themselves. For a typical 18-gauge (1.0 mm²) wire up to 5 meters long, the total resistance from end-to-end should be <0.5 ohms. A reading of >1 ohm indicates a problem—likely a partially broken strand or a corroded terminal. For longer runs or smaller gauges, calculate the expected value: copper wire has a resistance of ~10.5 ohms per 1000 meters for a 2.5 mm² cross-section.
For a 12V circuit carrying a 5-amp load (e.g., a fuel pump circuit), probe the circuit at both ends. A healthy circuit will show a voltage loss of <0.2V from the source to the component. If you measure a 1.5V drop, that means 12.5% of the electrical energy is being wasted as heat at the fault point. This often translates to ~15 watts of heat dissipation at a connector or a section of damaged wire, which is enough to raise the temperature of a terminal by 40°C above ambient.
Using a megohmmeter, apply 500 volts DC between the wire conductor and a known good ground. A reading of >50 MΩ is excellent. Any value <5 MΩ indicates insulation that has become compromised by moisture or chemical contamination and is allowing significant current leakage, often >10 mA. This parasitic drain is enough to discharge a 60 Ah vehicle battery in under 10 days of inactivity.
A wire harness assembly inspection demands methodical validation. Visually check for insulation tears (>0.5mm) or frayed conductors; use calipers to measure connector insertion depth (±1mm tolerance). Verify routing avoids sharp edges (min 3x wire diameter bend radius) and test continuity with multimeters (<0.1Ω resistance) to confirm integrity.
