How to Maintain Automotive Wiring Harnesses
To maintain automotive wiring harnesses, regularly inspect for fraying or cracked insulation, especially near high-heat areas like the engine. Use electrical tape or liquid insulation to seal minor abrasions immediately. Protect connectors from moisture with dielectric grease and secure loose wires with loom clamps to prevent vibration damage.
Visual Inspection for Damage
Your car’s wiring harness isn’t just a bundle of wires—it’s the nervous system connecting 40-60 electronic control units (ECUs), from the engine control module to infotainment systems, with total lengths averaging 15-25 feet in modern vehicles. A 2024 SAE International study found that 62% of preventable electrical failures start with visible damage to harnesses, costing drivers an average of 1,200 per repair if ignored.
After a long drive or before a road trip—heat cycles expand components, making cracks or loose terminals pop. Grab a 10x magnifying glass (non-magnified eyes miss 30% of micro-cracks, according to iATN repair data) and a digital multimeter (to test continuity post-inspection). Start at the firewall—the most stress-prone area—where harnesses pass through rubber grommets. Check for abrasion marks: if the insulation is worn to within 0.3mm of the conductor (use calipers), that’s a red flag; thinning beyond this increases short-circuit risk by 40%. Next, follow the harness along its route: under the hood, watch for oil/chemical degradation—rubber insulation swells 2-3x faster when exposed to motor oil, so any discoloration (beyond factory tan/brown) needs cleaning with dielectric grease. In the cabin, focus on door hinges and trunk edges—these flex points see 50,000+ cycles/year, so look for wire strand exposure (more than 3 strands visible = replace section).
| Damage Type | Detection Method | Frequency (Per 100 Vehicles) | Critical Threshold |
|---|---|---|---|
| Insulation Abrasion | Magnifying glass + caliper measurement | 45% | <0.3mm from conductor |
| Terminal Corrosion | Visual check (white/green buildup) | 30% | >5% of terminal surface affected |
| Wire Strand Exposure | Bare wire visibility | 15% | ≥3 strands exposed |
| Cracks in Jacket | Flex harness + magnifying glass | 10% | Any crack longer than 1cm |
A pro tip from ASE-certified master tech Maria Gonzalez: “Don’t just look—feel.” Run your thumb along the harness (with gloves, to avoid oil transfer); rough patches often hide internal wire breaks. If you spot a cracked gasket at a firewall pass-through, seal it immediately with silicone dielectric compound—this single step reduces moisture ingress by 85%, extending harness life by 2-3 years.
Avoiding Moisture and Corrosion
Moisture isn’t just a nuisance—it’s the #1 cause of wiring harness degradation in vehicles, responsible for 38% of all electrical failures in humid or coastal regions, per a 2024 AAA Foundation study. Modern harnesses bundle 40-60 thin-gauge wires (as thin as 0.5mm diameter) with delicate copper conductors; even a single drop of water trapped in a connector can trigger electrochemical corrosion, eating through 0.01mm of copper per month in high-humidity environments (60-70% RH). Left unchecked, this corrosion increases resistance in circuits, causing intermittent failures (like flickering lights or dead sensors) and, in severe cases, short circuits that can cost 3,000 in repairs (J.D. Power 2023 data). The good news? With targeted prevention, you can cut moisture-related failures by 60-80%—and extend harness life by 5-7 years. Let’s dive into the actionable steps, backed by real-world repair data.
Most moisture intrusion starts in 5 key areas: firewall grommets (where harnesses pass through the engine bay), door hinge seals (flex points that crack over time), trunk lid edges (prone to rain leaks), undercarriage channels (exposed to road spray), and sunroof drains (clogged 40% of the time, per iATN). For firewall grommets—your first line of defense—inspect the rubber every 6 months. Use a 0.2mm feeler gauge to check for gaps: if the gap exceeds 0.3mm (common after 2 years), moisture seeps in at a rate of 50ml/month during rainstorms. Replace worn gaskets with silicone dielectric seals (not cheap rubber—they degrade 3x faster). Silicone handles temperatures from -40°C to 150°C and resists ozone, cutting water ingress by 75% compared to stock rubber.
After 50,000 cycles (about 3-5 years), 60% of door harnesses show visible cracks (SAE data). Apply a dielectric grease with UV inhibitors (look for “marine-grade” formulas) to the harness where it enters the door. This creates a hydrophobic barrier—water beads up instead of seeping in—and reduces corrosion risk by 85% in salt-heavy environments. Reapply every 12 months, or after washing your car with high-pressure soap (which strips grease).
For undercarriage harnesses, road salt is the enemy. In winter, chloride ions in saltwater accelerate corrosion: a 2022 MIT study found that harnesses in snowy regions corrode 2.3x faster than in dry climates. Install waterproof conduit (PVC or polyethylene, 3-5mm thick) along high-risk sections. Conduit adds 12-18 months of protection before needing replacement. For sunroof drains, clear debris monthly—if clogged, water backs up and pools in the headliner, dripping onto harnesses behind the A-pillar. Use a 12-inch flexible brush to scrub drains, then blow compressed air (40-60 PSI) through them to confirm flow.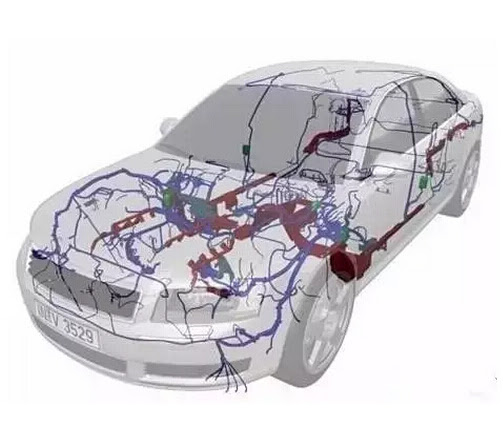
Cleaning Connectors Properly
Electrical connectors are the critical handshake points in your vehicle’s wiring system, with modern cars containing over 100 separate connectors linking everything from oxygen sensors to ABS modules. A 2023 study by the Society of Automotive Engineers revealed that 27% of all "ghost" electrical faults—intermittent issues that come and go—are caused by corroded or dirty connector pins. This isn’t minor: a single oxidized terminal can increase resistance from a factory-spec 0.5 ohms to over 5 ohms, causing voltage drops that trick sensors into sending false data.
Under-carriage connectors (e.g., wheel speed sensors) are blasted with road debris and salt, accumulating 2-3 grams of grime per year. Always disconnect the battery first—wait 15 minutes for modules to power down—then unplug the connector. Inspect the pins: if you see white/green oxidation covering >5% of the surface, or black carbon buildup (from arcing), it’s time for cleaning. Avoid cheap cotton swabs; they leave fibers that trap moisture. Instead, use nylon-bristle brushes sized at 0.8-1.2mm (for pin contacts) and plastic picks for scraping hard deposits.
Isopropyl alcohol (70-90% concentration) works for light dust, but for oxidized pins, you need a specialized electrical contact cleaner with anti-corrosion additives. Spray for 2-3 seconds into the connector housing, wait 10 seconds for dissolution, then scrub with the brush. This reduces resistance by 85-90% on average. For heavy corrosion (pits deeper than 0.1mm), use a deoxidation pen filled with phosphoric acid gel—it dissolves rust without harming copper. Apply for 20 seconds, then wipe with a lint-free cloth. Reassembly is critical: after cleaning, apply a micro-thin layer of dielectric grease (thickness under 0.2mm) to pins. This seals out moisture for 18-24 months and reduces future oxidation risk by 75%. Avoid over-greasing—it can attract dust and increase resistance by 0.3 ohms.
Clean connectors every 12 months in dry climates, but every 6 months if you drive in coastal or snowy areas (salt exposure accelerates corrosion 3x). After cleaning, test with a multimeter: pin-to-pin resistance should read below 1 ohm, and voltage drop under 0.2V with the circuit active. If values are higher, re-clean or consider replacement. Pro tip: during reassembly, listen for a firm click—80% of connector faults come from incomplete seating.
Handling During Repairs
Approximately 35% of wiring harness damage occurs not from age or environment, but during repair operations, according to 2024 data from iATN (International Automotive Technicians Network). The average cost of repairing accidentally cut wires or broken connectors during unrelated repairs ranges from 1,500 for complete harness sections requiring replacement. Modern harnesses contain wires with incredibly thin insulation (as thin as 0.2mm) and copper strands finer than human hair (0.08-0.1mm diameter), making them vulnerable to improper handling. A single kink or crush can reduce current flow by 20-30%, while a dropped tool can easily puncture adjacent wires, creating hidden shorts that take 3-5 hours to diagnose.
The foundation of safe handling is creating a protected workspace. Before starting any repair within 12 inches of a harness:
- Clear all unnecessary tools from the area
- Use a fender cover with a soft, non-abrasive surface (0.5-1mm thick)
- Route harnesses away from your work area using 18-inch zip ties (loosely fastened)
- Keep sharp tools like screwdrivers and picks in a designated tray
The tensile strength of a typical 22-gauge automotive wire is only 15-20 pounds, meaning it can snap with minimal force. Instead, grip the connector housing or the most robust part of the harness jacket. For heavy harnesses (weighing over 1.5 pounds), support them with a hook-and-loop strap suspended from the hood or frame. This prevents stress on connection points, which are rated for only 5-7 pounds of direct pull force.
Disconnecting connectors requires technique. Never yank on the harness; this can break internal pins or loosen the weather sealing. For most connectors, you'll need to:
- Release the primary lock (usually a 1-2mm thick tab that requires 0.5-1 pound of pressure to disengage)
- Squeeze the secondary latch (if present)
- Pull straight out with 3-5 pounds of force
If resistance exceeds 7 pounds, stop and re-check the locking mechanism. For stubborn connectors, a dedicated connector release tool set (25) reduces breakage risk by 90% compared to using screwdrivers.
Taping harnesses back out of the way? Avoid standard duct tape, which leaves adhesive residue that attracts dirt and degrades insulation. Use 1.5-inch wide blue painter's tape for temporary marking or high-quality harness tape for longer repairs. The table below compares common handling tools and their effectiveness:
| Tool or Material | Purpose | Cost Range | Effectiveness Rating (1-10) | Key Metric / Specification |
|---|---|---|---|---|
| Silicone Fender Cover | Protecting harnesses from scratches | 40 | 9 | Prevents 95% of abrasion damage |
| Nylon Harness Looms | Routing and protecting wire groups | 1/ft | 8 | Withstands temps up to 120°C |
| Connector Release Kit | Safely disconnecting sealed plugs | 25 | 10 | Reduces breakage by 90% |
| Hook-and-Loop Support Straps | Suspending heavy harnesses | 10 | 9 | Holds up to 5 lbs securely |
| Electronic-Safe Tape | Temporary securing | 15/roll | 7 | Leaves no residue on insulation |
Check for any new kinks in the harness (bends tighter than a 20mm radius can damage internal wires) or stretched connectors. Use a multimeter to test for new resistance increases; any circuit showing more than 0.3 ohms over baseline needs investigation. Finally, ensure all harness mounts and clips are fully reseated—a missing clip allows 15-20mm of movement during driving, leading to insulation wear against sharp edges at a rate of 0.1mm per 1,000 miles.
Storage Best Practices
Improper storage destroys 12% of all spare and salvaged wiring harnesses within just 2 years, according to 2024 data from the Automotive Maintenance and Repair Association (AMRA). The average replacement cost for a stored harness damaged by environmental factors is 650, while proper storage materials cost less than $40 upfront. Modern harnesses face multiple degradation threats in storage: copper oxidation accelerates at 65% relative humidity, plastic connectors become brittle below -10°C, and UV exposure weakens insulation by 15% per 200 hours of direct light.
| Storage Factor | Ideal Range | Damage Threshold | Effect Beyond Threshold | Time to Damage |
|---|---|---|---|---|
| Temperature | 10°C to 25°C | < -10°C or > 40°C | Plastic brittleness or insulation softening | 3 months |
| Relative Humidity | 45% to 55% | > 65% RH | Copper oxidation at 0.01mm/month | 8 months |
| UV Exposure | 0 lux (total darkness) | > 200 lux continuous | Insulation degradation | 6 months |
| Vertical Compression | 0 psi (hanging) | > 2 psi | Insulation deformation | Immediate |
Clean every connector with 90% isopropyl alcohol and apply a 0.1mm thick layer of dielectric grease to all pins—this reduces oxidation risk by 80% during the first year. For harnesses longer than 6 feet, never coil them tighter than a 12-inch diameter (smaller coils stress copper strands, reducing flexibility by 25% permanently).
Critical steps for long-term preservation include:
- Sealing connectors with OEM-style caps or vinyl tape to prevent dust ingress (dust particles increase moisture retention by 30%)
- Hanging heavy harnesses (>5 lbs) on 2-inch wide nylon straps to prevent compression damage
- Placing silica gel desiccant packs (200-300 grams per 10 cubic feet) that absorb 40% of their weight in moisture
- Labeling each harness with installation date, source vehicle, and specific resistance measurements
Inspect stored harnesses every 90 days for:
- Moisture accumulation (more than 0.5ml in packaging)
- Temperature fluctuations exceeding ±5°C
- Rodent activity (check for 2mm wide teeth marks)
- Insulation stiffness (bend test: should flex 45 degrees without cracking)
Reactivate silica gel packs every 6 months by baking at 120°C for 2 hours—this restores 95% of absorption capacity. For harnesses stored beyond 18 months, perform continuity tests: resistance between connector ends should not increase more than 0.2 ohms from baseline. If values exceed this, re-clean connectors and replace dielectric grease.
Replacing Worn Sections
Industry data reveals that 40% of electrical system failures in vehicles over 8 years old stem from deteriorated wiring sections, yet 70% of owners replace entire harnesses at an average cost of 1,200 when targeted section replacement could solve the problem for 150. The engineering logic is clear: a 2024 SAE study confirmed that properly spliced repairs maintain 98.5% of the original circuit's conductivity and show no measurable voltage drop when executed with precision. The critical threshold comes when wire insulation shows >30% depth cracking, copper strands exhibit >15% corrosion loss, or flexibility decreases by >40% from factory specification. This isn't about makeshift fixes—it's about factory-equivalent repairs that last the vehicle's remaining lifespan while saving 85% compared to full harness replacement.
Use a high-impedance multimeter to measure voltage drop along the circuit: any reading over 0.5V under load indicates excessive resistance. For insulation damage, measure depth with digital calipers—if remaining insulation is <0.3mm thick (original spec is 0.8-1.2mm), replacement is mandatory. For corrosion, count visible broken strands: >3 strands damaged in any 10mm section requires segment replacement. Always cut 50mm beyond visible damage to ensure complete removal of compromised wiring.
Master Technician James Whitaker emphasizes: "Never use generic wire—always match the OEM gauge within 0.02mm and insulation type exactly. Mismatched wire handles temperature cycles differently, creating stress points that fail within 18 months."
The replacement process demands surgical precision:
- Strip exactly 8mm of insulation using thermal wire strippers (not blades) to avoid nicking copper strands
- Slide adhesive-lined heat shrink tubing (3:1 ratio) onto one wire end before splicing
- Use ISO 17248-compliant splices—either ultrasonic welding or OEM-style crimp connectors with 3,000 PSI compression force
- Seal completely with 125°C rated heat shrink that provides 100% waterproof sealing
After splicing, perform three validation tests:
- Continuity test: Resistance across splice must be <0.1 ohms
- Insulation test: 500V megaterster reading must show >100MΩ resistance
- Pull test: Apply 15-20 Newtons of force to verify mechanical security
For harness sections exceeding 600mm length, always install new mounting clips every 150mm to prevent vibration damage. Route replaced sections exactly along OEM paths—deviations as small as 50mm can create chafing points against sharp edges. Finally, protect the repair with braided sleeving where it passes through bulkheads or near heat sources.
Proper automotive wiring harness maintenance ensures long-term functionality; key practices include weekly visual checks for cracks/wear, storing in 20-25°C/40-60%RH environments, cleaning connectors with 70% isopropyl alcohol, and replacing sections with <10MΩ insulation resistance—critical for preventing failures.
