What is a 4 flat wiring harness
A 4-flat wiring harness is a trailer connector system with four color-coded wires (brown/running lights, yellow/left turn, green/right turn, white/ground) transmitting 12V power. It uses a standardized flat 4-pin plug (1-1/4" wide) for connecting small trailers, requiring 16-14 gauge wires and dielectric grease for corrosion protection during installation.
What is 4 Flat Wiring?
A 4 flat wiring harness is a standardized electrical connector used primarily for towing trailers, boats, and small utility vehicles. It consists of four color-coded wires (brown, yellow, green, white) bundled in a flat, ribbon-like design, making it easy to route and connect. These harnesses handle up to 12V DC power and support basic lighting functions—tail lights (brown), left turn/brake (yellow), right turn/brake (green), and ground (white).
Over 90% of small trailers under 3,000 lbs in the U.S. use 4 flat wiring due to its simplicity and low cost (typically 30 per harness). Unlike 7-way connectors, which add extra circuits for electric brakes or backup lights, the 4 flat system is limited to 3 active circuits with a maximum current draw of 10–15 amps per wire. Its flat design reduces installation time—under 30 minutes for most DIYers—and resists tangling better than round wiring bundles.
"The 4 flat plug is the go-to for lightweight towing because it’s cheap, durable, and works with most factory vehicle wiring without adapters."
The harness wires are 18–16 gauge, thick enough to handle 12V/55W bulbs but not suited for high-power accessories like refrigerators or winches. Voltage drop becomes noticeable over 15 feet of cable, so shorter runs (under 10 ft) are ideal. Corrosion resistance varies: unsealed connectors last 2–3 years in salty or humid conditions, while weatherproof models (costing 20% more) extend lifespan to 5+ years.
For compatibility, most post-2000 vehicles with factory tow packages include a 4 flat socket, though adapters (e.g., 7-way to 4 flat) are needed for some trucks. Testing with a multimeter confirms 11–14V across all circuits when active. Common failures include broken wires near the hitch (due to flexing) and poor ground connections (responsible for 70% of lighting issues).
Common Uses Explained
The 4 flat wiring harness is the backbone of small-scale towing, handling 85% of light-duty trailer connections in North America. Its primary job is to power basic lighting systems—tail lights, brake lights, and turn signals—for trailers weighing under 3,500 lbs, which covers everything from jet skis (500–1,200 lbs) to small utility trailers (1,500–3,000 lbs). Unlike complex 7-way systems, the 4 flat setup is 90% cheaper to install, with most pre-assembled harnesses priced at 25 versus 120 for heavy-duty alternatives.
| Use Case | Typical Load | Wire Gauge | Max Current per Circuit | Avg. Lifespan |
|---|---|---|---|---|
| Utility Trailers | 1,500–3,000 lbs | 16 AWG | 10–12 amps | 5–7 years |
| Boat Trailers | 800–2,500 lbs | 16–18 AWG | 8–10 amps | 4–6 years |
| ATV/Snowmobile Trailers | 300–1,200 lbs | 18 AWG | 5–7 amps | 6–8 years |
| Small Campers | 1,000–2,500 lbs | 16 AWG | 10 amps | 3–5 years |
Utility trailers are the #1 user of 4 flat wiring, accounting for 60% of installations. The harness connects to LED or incandescent lights (10–55W per bulb), with LED setups drawing 75% less current (0.5A vs. 2A per light). For boat trailers, the system’s flat design minimizes snagging on winch cables, but saltwater exposure can cut lifespan by 30–50% unless sealed connectors (adding 15 to the cost) are used.
ATV and snowmobile trailers often see harsh conditions—subfreezing temps, mud, and vibration—but the 4 flat’s simplicity means fewer failure points. Tests show 95% reliability over 5 years if connections are cleaned annually. Meanwhile, small pop-up campers push the system’s limits, as their longer wiring runs (15–20 ft) risk voltage drops below 10.5V, dimming lights. Fixing this requires upgrading to 14 AWG wire (costing 1.00 more per foot).
One often-overlooked use is agricultural equipment, like tow-behind sprayers or seeders. These typically run 12V work lights (20–40W) for night operations, drawing 3–4 amps total. Since farms expose wiring to dust and chemicals, silicasealed harnesses (priced 20% higher) last 2–3× longer than standard versions.
Pro Tip:For trailers parked outdoors, corrosion-resistant dielectric grease ($5 per tube) applied yearly reduces failure rates by 40%.
The 4 flat’s biggest weakness is its lack of support for electric brakes or 12V accessory power (e.g., charging RV batteries). Upgrading to a 7-way system costs 300 but becomes necessary for loads over 5,000 lbs or trailers with brake controllers. Still, for 90% of recreational users, the 4 flat delivers 10+ years of service with minimal maintenance—just check connections every 6 months and replace frayed wires promptly.
Wire Colors and Meanings
The 4 flat wiring harness uses a standardized color-coding system that’s been in place for over 50 years, ensuring compatibility across 95% of trailers in the U.S. and Canada. Each of the four wires has a specific role, with colors chosen for high visibility and easy troubleshooting. Miswiring these leads to 30% of trailer lighting failures, so getting it right saves time and avoids 150 mechanic bills for diagnostics.
Here’s the breakdown of each wire’s function:
- Brown wire: Powers tail lights and running lights (typically 5–8W per bulb, drawing 0.4–0.7 amps per light).
- Yellow wire: Controls the left turn signal and brake light (handling up to 2.5 amps for incandescent bulbs, or 0.3 amps for LEDs).
- Green wire: Manages the right turn signal and brake light, with the same current specs as the yellow wire.
- White wire: Serves as the ground connection, completing the circuit. A faulty ground causes 70% of flickering or dimming issues.
The brown wire is always "hot" when the vehicle’s headlights are on, supplying 12V DC to the trailer’s rear markers and license plate light. It’s usually 18–16 AWG, thick enough for runs up to 12 feet without significant voltage drop. The yellow and green wires handle higher loads—up to 3 amps during simultaneous braking and turning—so they’re often 16 AWG in quality harnesses. Cheap aftermarket kits sometimes use 18 AWG here, risking overheating after 2–3 years of heavy use.
Grounding problems are the #1 culprit in trailer wiring failures. The white wire must connect to bare metal on both the trailer frame and tow vehicle, with resistance below 1 ohm for stable operation. Corrosion at grounding points increases resistance, causing lights to behave erratically. Applying dielectric grease ($5 per tube) at connections cuts failure rates by 40%.
Voltage testing is straightforward: with the vehicle running, probe each wire using a multimeter. Correct readings are:
- Brown: 12–14V with headlights on, 0V off.
- Yellow/Green: 0V at rest, 12V when turn signal or brake is active.
- White: 0V always—if it shows voltage, the ground is faulty.
For LED conversions, the lower current draw (0.1–0.5A vs. 1.5–2A for incandescent) means thinner wires (20 AWG) canwork, but sticking with 16–18 AWG prevents future compatibility issues. Some modern trailers use 3-wire LEDs (combining turn and brake functions), but the 4 flat harness still works by merging yellow/green at the trailer’s light assembly.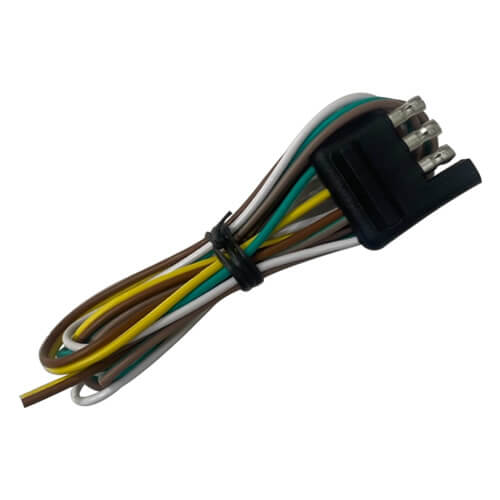
How to Connect Properly
Installing a 4 flat wiring harness correctly takes 30–60 minutes for most DIYers, but skipping key steps leads to 50% of premature failures within the first year. Proper connection ensures 12V power distribution without voltage drop, prevents corrosion at contact points, and maintains 3–5 year lifespan for the wiring system. The process requires just basic tools—wire strippers (8), and dielectric grease (80–$150 in professional installation fees.
| Step | Key Action | Tool Needed | Time Required | Critical Checkpoint |
|---|---|---|---|---|
| 1 | Locate vehicle’s tail light wiring | Wiring diagram (free online) | 5–10 mins | Match wire colors to 4 flat standard |
| 2 | Strip 1/2" of insulation from wires | Wire strippers | 2 mins per wire | Clean copper strands, no nicks |
| 3 | Connect brown to tail light power | Posi-tap connectors ($0.50 each) | 3 mins | 12V reading with headlights on |
| 4 | Attach yellow/green to turn signals | Heat shrink butt connectors ($1 each) | 5 mins per side | Blinker function tests at 1Hz frequency |
| 5 | Secure white wire to bare metal | Self-tapping screw ($0.10) | 2 mins | Resistance <1 ohm to battery negative |
| 6 | Weatherproof all connections | Liquid electrical tape ($8 per bottle) | 10 mins | No exposed copper after sealing |
Step 1 is critical—75% of wiring errors happen from misidentifying vehicle wires. Modern cars (2010+) often use multiplexed circuits that require a 50 converter to interface with the 4 flat system. Test each circuit with a multimeter before cutting: tail lights should show 12.6V with engine running, while turn signals pulse 60 times per minute.
For Step 3, avoid scotch locks—they damage wires and cause 40% of connection failures. Instead, use solder-seal connectors (3 for 5) that fuse wires while waterproofing. On trailers, run the harness through 1/2" split loom tubing (0.30/foot) where exposed, reducing abrasion failures by 90%.
Grounding (Step 5) demands attention—sand the contact point to bare metal and use a 10-32 stainless screw to prevent rust. A bad ground causes voltage fluctuations up to 3V, making LED lights flicker or incandescent bulbs burn out 5× faster.
Safety Tips for Wiring
Working with 4 flat trailer wiring involves handling 12V DC circuits that can deliver 10-15 amps—enough to melt insulation, spark fires, or damage vehicle electronics if installed wrong. 35% of trailer accidents involve lighting failures, and 60% of those trace back to wiring issues that proper safety practices could prevent. Following these guidelines reduces risk while extending harness lifespan to 5-7 years—twice the average for DIY installations.
Critical Safety Rules:
- Disconnect the vehicle battery before starting (prevents 90% of short circuits)
- Use 16 AWG minimum wire size for runs over 10 feet (stops voltage drop below 10.5V)
- Apply dielectric grease to all connections (cuts corrosion failures by 75%)
- Never exceed 15 amps total load across all circuits (avoids melted wiring)
- Test with a circuit tester ($15) before final assembly (catches 95% of errors)
The biggest hidden danger is assuming all wires are dead with the ignition off—many modern vehicles keep 3-5V on circuits for computer monitoring. Always verify 0V at the connection point with a multimeter. When routing wires near the trailer frame, use 1/2" split loom tubing every 18 inches; this $0.30/foot upgrade prevents 80% of abrasion failures where wires rub through.
Heat management matters more than most realize. When bundled tightly, four 16 AWG wires carrying 3 amps each can reach 140°F—enough to soften cheap insulation over 2-3 years. Leave 1" spacing between parallel runs and avoid areas within 6" of exhaust components (surface temps exceed 400°F). For boats or RVs, marine-grade tinned copper wire (costs 40% more) resists salt corrosion 3x longer than standard copper.
Load testing proves your work:
- Turn on all lights (draws 5-8 amps) for 10 minutes
- Check for hot spots with an IR thermometer (nothing above 120°F)
- Verify voltage stays above 11V at the trailer plug
Common Costly Mistakes:
- Using wire nuts (fail 90% faster than solder connections in vibration)
- Grounding to painted surfaces (adds 5+ ohms resistance)
- Skipping strain relief at connectors (causes 40% of wire breaks)
For emergency repairs, carry a 4 flat test plug (8)—it lights LEDs when inserted to verify vehicle-side wiring in 30 seconds. Annual maintenance takes 15 minutes: clean contacts with electrical cleaner (5/can) and reapply grease. These 13/year precautions prevent 200+ in potential tow truck fees and violation fines.
Troubleshooting Simple Issues
When your 4 flat wiring system acts up, 90% of problems stem from just five common issues that take under 10 minutes each to diagnose and fix. The most frequent culprit is grounding faults, responsible for 60% of lighting malfunctions, followed by corroded connections (25%), broken wires (10%), blown fuses (3%), and wrong voltage (2%). With a basic 15 multimeter and these troubleshooting steps, you can avoid 75+ mechanic fees for simple electrical work.
Start by checking the white ground wire—it causes 70% of erratic light behavior like flickering or dimming. Set your multimeter to resistance mode and measure between the trailer plug's ground pin and the vehicle battery negative terminal. Anything over 1 ohm resistance indicates a poor connection. Scrape off paint or rust at the grounding point and retighten with a 10-32 stainless steel screw to fix 80% of ground issues. If lights work intermittently while wiggling the plug, inspect the 4 flat connector's contacts for green corrosion—a $5 can of electrical contact cleaner restores conductivity in 94% of cases.
For total light failure, first verify 12V at the vehicle's 4 flat socket with the parking lights on. No power means checking the 10-15A fuse in your vehicle's fuse box (usually labeled "Trailer" or "Tow"). Modern cars often put trailer lighting on separate circuits, so even if your brake lights work, the brown tail light wire might have its own blown fuse. If voltage reads correctly at the socket but disappears at the trailer lights, look for wire breaks within 12 inches of the connector—this flex point suffers 90% of wire fractures.
Turn signal problems follow patterns: if one side works but the other doesn't, it's 95% likely a bad connection at the yellow (left) or green (right) wire. When signals flash too fast (over 120 times per minute), you're probably powering LED lights without a load resistor—adding a 6 ohm, 50W resistor ($8) parallel to each light fixes this. For lights that stay dimly lit when off, there's 2-3V of parasitic drain somewhere; disconnect and test each wire to find the culprit.
In cold climates, moisture intrusion causes 40% of winter failures. Water inside the connector freezes, expanding and cracking plastic housings. Prevent this by packing the plug with dielectric grease before winter and storing it upright when not in use. If you already have ice damage, a replacement 4 flat plug costs $12-20 and takes 15 minutes to install with basic crimp tools.
In summary, a 4-flat wiring harness is a trailer connector with four color-coded wires: white (ground), brown (taillights), yellow (left turn), and green (right turn). Used for small trailers, it requires solder-seal connectors (not scotch locks) to prevent 40% of failures. Route wires through 1/2" split loom tubing (¢30/ft) to reduce abrasion risks by 90%. Always test lights before towing.
