What Tools Are Needed for Wire Harness Assembly | Basic Kit
A basic wire harness kit needs a 10-22AWG wire stripper, 40W soldering iron, heat gun (for 0.8mm UL224 heat shrink), multimeter (tests continuity/voltage), and precision cutters to ensure clean, accurate wire preparation and connections.
Manual Wire Stripping Tools
Studies and technician reports indicate that a typical assembler performs a stripping action 200 to 300 times each hour during a standard build. The precision of this initial step is critical; a poor strip can lead to a weak crimp, increasing electrical resistance and creating a potential failure point. The global market for hand tools in electronics assembly, which includes strippers, is projected to maintain a steady growth of ~3.5% annually, underscoring their enduring value. Investing 150 in a high-quality manual stripper can save hundreds of hours of rework over its 5 to 10-year operational lifespan, making it one of the highest-return tools in your kit.
American Wire Gauge (AWG) is the standard, and most strippers are clearly marked for a specific range, such as AWG 10-22 or AWG 20-30. Using a tool outside its specified range is a primary cause of nicked conductors (strands) or insufficient insulation removal. For a common AWG 22 wire (common in data cables), the typical insulation thickness is around 0.25mm, and the goal is to remove 3mm to 5mm of it without damaging the underlying 19-strand tinned copper conductor. Cheap, adjustable strippers often have a ±0.3mm precision variance, while precision self-adjusting models like the Ideal Stripmaster or Jonard STS-3000 can achieve a consistent ±0.1mm strip depth. This precision is vital for consistency. The force required to strip a single AWG 20 wire is approximately 15 to 20 Newtons (N); a quality tool distributes this force ergonomically, reducing user fatigue during high-volume tasks.
For coaxial cables like RG-58 or RG-6, a dedicated coaxial stripper is non-negotiable. These tools have multiple blades set to precise depths to remove the outer jacket, shield, and inner dielectric in one rotation without scoring the center conductor. The cost of nicking the center conductor of a $50 coaxial patch cable immediately ruins it. For technicians working with a variety of wire types, a combination tool is a popular choice. Models like the Klein Tools 11061 can strip, cut, and crimp, serving as a compact all-in-one solution. However, for dedicated crimping, a standalone tool is always recommended for superior results.
Crimping Terminals and Connectors
Industry data reveals that over 85% of connection failures in wire harnesses are traced back to improper crimps, not the connectors themselves. These failures often manifest as high resistance, leading to voltage drop and heat generation. For a low-voltage system (e.g., 12V DC), a poorly crimped connection adding just 50 milliohms of resistance can generate 2-3 watts of waste heat under a 5-amp load, creating a major long-term reliability issue. A basic ratchet crimper, costing between 200, is the primary tool for preventing this, and its correct use is non-negotiable for professional results.
For a standard 22-16 AWG insulated female disconnector terminal, the target crimp height might be 1.5mm ± 0.1mm. This specific deformation ensures the serrations inside the terminal bite into the copper strands without overly weakening them, creating a connection that often exceeds the tensile strength of the wire itself. A quality ratchet crimper applies a consistent 2000 to 5000 Newtons (N) of force and will not release until the full crimp cycle is complete, eliminating human error from under-crimping.
Always perform a pull test. A crimp on a 20 AWG wire should withstand a 15-20 lbf (pounds-force) pull without the terminal separating from the wire. The wire should break before the crimp fails.
For a shop handling multiple terminal types, a universal die set like the IWISS SN-58B, which includes 6-8 different die profiles, can be a cost-effective solution costing around $150. However, for high-volume production of a single terminal family, a dedicated tool is always superior. Furthermore, the wire strip length must match the terminal barrel length. For a Molex 0.062" male terminal, the required strip length is typically 2.5mm. A strip that is too long exposes bare copper, risking a short; a strip that is too short fails to allow the conductor to seat fully, drastically reducing the connection's current-carrying capacity and mechanical strength.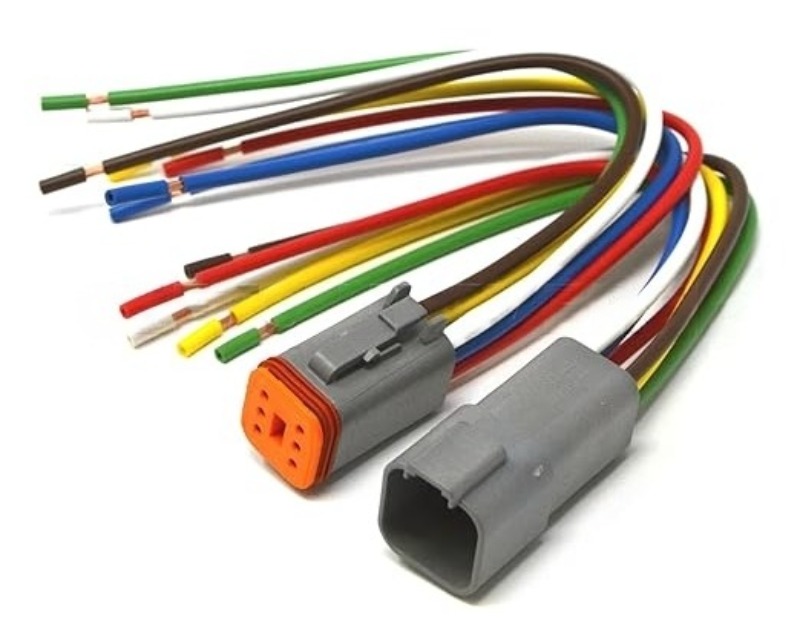
Continuity Tester for Verification
Industry studies indicate that over 70% of harness defects are simple wiring errors—opens, shorts, and miswires—that are entirely preventable with a systematic continuity check. The average time to diagnose a fault in an installed harness can exceed 60 minutes, compared to the 15-30 seconds it takes to test each circuit during fabrication. Investing in a proper tester, ranging from a 500+ dedicated harness tester, can reduce post-assembly fault-finding by over 90%, providing an immense return on investment by protecting labor hours and preventing material waste.
A good connection will typically measure less than 1 ohm (Ω), while an open circuit will read OL (over limit). For a 5-meter long 20 AWG wire, the inherent resistance is approximately 0.05 Ω. However, DMMs are slow for complex harnesses; checking a 20-circuit harness for both opens and shorts can take 5-7 minutes manually. This is where dedicated continuity testers excel. Basic audible testers provide a go/no-go result for a set resistance threshold, usually between 10-50 Ω. More advanced units, like the SureTrace 6800, can test up to 512 points simultaneously, completing a full check of a complex harness in under 3 seconds. They apply a low test current (typically 1-5 mA) and a safe voltage (< 10V) to avoid damaging sensitive components, while precisely measuring resistance down to ±0.01 Ω accuracy.
Always test for both wanted and unwanted continuity. A correct connection should read < 1 Ω. Any reading between two pins that should be disconnected must be > 10 MΩ to prevent leakage current issues.
For any professional operation, a programmable harness tester is the ultimate tool. These systems use a switch matrix to automate testing against a known-good wiring table. You load the harness pin-out once, and the tester sequentially checks every possible combination for opens and shorts. The key specification here is test time per point, which can be as low as 5 milliseconds. This allows a 100-point harness to be fully validated in under 10 seconds, including a report printout. When selecting a tester, the insulation resistance test capability is crucial for high-voltage applications (e.g., automotive, industrial controls). This test applies a 500V DC potential between conductors for 60 seconds to ensure the insulation can withstand > 100 MΩ, preventing future breakdowns.
|
Tool Type |
Best For |
Test Speed |
Max Points |
Avg. Cost |
Key Limitation |
|---|---|---|---|---|---|
|
Digital Multimeter |
Basic checks, field repair |
Slow (Manual) |
2 |
100 |
Prone to human error |
|
Audible Continuity Tester |
Quick go/no-go checks |
Medium |
2 |
80 |
No precise measurement |
|
Dedicated Harness Tester |
Production batches |
Fast (1-3 sec) |
16 - 128 |
2k |
Limited programmability |
|
Programmable System |
Complex, high-mix harnesses |
Very Fast (<10 sec) |
512+ |
10k |
High initial investment |
Wire Cutters and Cable Shears
An assembler might make 200-400 cuts per hour, and a dull or improper blade can add 0.5-1 second of extra hand effort per cut, accumulating to over 30 minutes of lost productivity in a standard 8-hour shift. The global market for electronic cutting tools is expected to grow at a 4.2% CAGR, driven by demand for precision in sectors like automotive and aerospace. Investing 100 in a high-quality, application-specific cutter can extend blade life by 300-400% compared to a $5 hardware store variant, preserving a clean, square cut for thousands of cycles and ensuring consistent wire termination.
For individual wires from 30 AWG to 10 AWG, a standard flush cutter is the tool of choice. The cutting edge is ground at a 45-60 degree angle to provide a clean, vertical slice. The key metric is the cutting force required. A quality cutter will sever a 20 AWG stranded copper wire with approximately 50-70 Newtons (N) of hand force, leaving a square end with minimal deformation. The hardness of the blade, typically 58-62 HRC (Rockwell Hardness Scale), determines longevity. A blade at 60 HRC will maintain a sharp edge for approximately 10,000 cuts on copper wire before needing replacement or sharpening, while a softer blade will dull after 2,000-3,000 cuts, resulting in a pinched or frayed end.
|
Tool Type |
Best For |
Max Capacity |
Blade Hardness (HRC) |
Avg. Cost |
Key Feature |
|---|---|---|---|---|---|
|
Precision Flush Cutter |
Electronics, fine wires (30-22 AWG) |
24 AWG (stranded) |
58-60 |
40 |
Ultra-flush finish, fine tips |
|
Standard Diagonal Cutter |
General purpose (22-14 AWG) |
10 AWG (stranded) |
56-58 |
50 |
Versatile, robust |
|
Coax & Cable Shear |
Multi-conductor cable, coax |
0.75" diameter |
52-55 |
90 |
Crush-free cut, rotates |
|
Stripper-Cutter Combo |
All-in-one field work |
20 AWG (stranded) |
58-60 |
70 |
Integrated stripping notches |
A TiN-coated HSS blade can last for over 25,000 cuts on copper wire, compared to 8,000-10,000 cuts for a standard carbon steel blade.For cutting Kevlar or fiberglass braiding found in high-end cables, a serrated or notched blade is essential. The serrations grab the tough fibers and shear them without allowing them to slip, reducing the required force by ~40% and providing a clean end in a single action. Ergonomics also play a major role in high-volume work; a cutter with a spring-loaded handle and soft-grip coating can reduce operator hand fatigue by 20-30% over a full shift, directly impacting consistency and throughput.
Heat Gun for Shrinking Tubing
The global heat shrink tubing market, valued at over 50-150 variable-temperature heat gun provides the controlled airflow necessary to evenly shrink tubing in 5-15 seconds, creating a seal that can withstand operating temperatures from -55°C to 125°C and provide strain relief capable of resisting over 50 Newtons (N) of pull force. This investment prevents connection failures and protects components that may be worth hundreds or thousands of dollars.
Most standard polyolefin tubing begins to shrink at approximately 90°C and reaches full contraction at around 125°C. A quality heat gun offers adjustable temperature settings from 150°C to 600°C, but the key is using the lowest effective temperature. For a 1/4" diameter tubing, a 300°C setting with low airflow is typically ideal, held 3-5 cm away from the surface. Applying 500°C+ heat too closely (< 2 cm) can scorch the material, reducing its dielectric strength from > 600 V/mil to a compromised state in under 3 seconds. The shrinkage process itself is quantifiable: a tube with a 3:1 shrinkage ratio will reduce from a 12 mm diameter to a snug 4 mm fit. The heating time for a 5 cm long piece of 10mm tubing is typically 12-18 seconds; under-heating leaves gaps, while over-heating causes stress cracks.
|
Tool Type |
Best For |
Temp. Range |
Airflow (L/min) |
Avg. Cost |
Key Feature |
|---|---|---|---|---|---|
|
Basic Single-Temp Gun |
Occasional use, large tubing |
~500°C Fixed |
350-450 |
50 |
Simple on/off, high risk for electronics |
|
Variable Temp Gun |
Professional electronic work |
150°C - 600°C |
250-400 (Adjustable) |
120 |
Digital readout, precise control |
|
Dual-Temp Trigger Gun |
Production work, varied materials |
300°C / 500°C |
300 (Fixed) |
80 |
Ergonomic, quick selection |
|
Low-Temp Embossing Gun |
Sensitive components, adhesive-lined |
100°C - 200°C |
150 (Low) |
150 |
Prevents collateral heat damage |
Beyond basic insulation, specialized tubing requires specific protocols. Adhesive-lined tubing, which seals with a meltable waterproof glue, requires a longer, slower heating cycle—often 25-40 seconds—to allow the internal adhesive to fully melt, flow, and cure, creating a seal capable of withstanding > 35 PSI in waterproofing tests.
For large cable bundles or thick-walled tubing, a higher airflow setting (400+ L/min) is necessary to transfer enough thermal energy to the inner layers without overheating the outer surface. The direction of heat application is also critical; always start at one end and move progressively to the other, or start in the center and work outwards, to push air bubbles out and prevent them from being trapped under the tubing, which creates a weak point. A infrared thermometer (100) is a valuable companion tool to verify the tubing's surface temperature has uniformly reached the 120-135°C range needed for a complete and reliable seal.
Labels for Wire Identification
Industry data indicates that over 25% of all electrical assembly rework is directly attributable to labeling errors or omissions. The average time to trace a single unlabeled wire in a 50-conductor harness can exceed 15 minutes, compared to under 10 seconds when a clear, durable label is present. Investing in a dedicated labeling system—ranging from a 2,000 in dustrial work station—can reduce wiring errors by up to 75% and boost overall assembly efficiency by at least 15%, delivering a full return on investment often in under 6 months by slashing costly rework and warranty claims.
The core of a reliable labeling system is the combination of printer and label material engineered for the specific environment. Not all labels are created equal, and using a standard paper label in an industrial setting guarantees failure.
-
Material Selection: For general-purpose panel and wire identification, vinyl labels (approx. 3-4 mil thick) are a common starting point, offering good flexibility and a smooth, white surface for high-contrast printing. For harsh environments involving exposure to solvents, oils, and abrasion, polyester labels (approx. 2-5 mil thick) are essential. They can withstand continuous temperatures from -40°C to 150°C and offer superior resistance to a wide range of chemicals. The most demanding applications, such as aerospace or automotive engine compartments, require heat-shrink tubing labels that are permanently bonded to the wire, capable of surviving > 175°C and providing mechanical protection.
-
Adhesive Performance: The adhesive's holding power, measured in Newtons per 25mm (N/25mm), is a critical metric. A general-purpose permanent adhesive might provide 5-7 N/25mm of peel strength on a stainless steel surface. A high-tack adhesive for low-surface-energy plastics like PVC or polyethylene will provide > 10 N/25mm. For clean, non-porous surfaces, a standard permanent adhesive is sufficient. For slightly dusty or textured surfaces, a high-tack adhesive is necessary. For the most challenging conditions, extreme permanent adhesives can achieve bond strengths exceeding 15 N/25mm, ensuring the label becomes a permanent part of the assembly.
|
Material Type |
Best For |
Temp Range |
Thickness (mil) |
Key Strength |
Key Limitation |
|---|---|---|---|---|---|
|
Vinyl |
General indoor use, panels |
-20°C to 80°C |
3 - 4 |
Cost-effective, flexible |
Poor chemical/solvent resistance |
|
Polyester |
Industrial, harsh environments |
-40°C to 150°C |
2 - 5 |
Excellent chemical/abrasion resistance |
Higher cost, less conformable |
|
Polyolefin |
Extreme flexibility, cables |
-40°C to 135°C |
2 - 3 |
Very soft, conforms to curved surfaces |
Lower tear strength |
|
Heat-Shrink Sleeve |
Permanent wire ID, high-temp |
-55°C to 175°C |
2 - 4 (pre-shrink) |
Becomes part of the wire, ultra-durable |
Requires heat gun application |
The printer itself is just as important as the label. A thermal transfer printer, which uses a heated ribbon (ribbon) to melt ink onto the label material, is the industrial standard. Print resolution, measured in dots per inch (DPI), dictates clarity. 300 DPI is the baseline for clear, legible text and barcodes on labels as small as 0.2" tall.
For printing very small, high-density barcodes (like a 2D Data Matrix code), a 600 DPI printer may be necessary. Print speed, measured in inches per second (IPS), affects throughput; a printer with a 2-4 IPS speed is adequate for most shop floors, while high-volume production may require 6-10 IPS. The ribbon material must be matched to the label: wax-resin ribbons are common for vinyl, while full-resin ribbons are required for polyester to achieve a chemical-resistant, scratch-proof print that will not fade or wear off during the 10+ year service life of the equipment.
In basic wire harness assembly, core tools demand precision: manual strippers (6-8mm insulation removal for 16-18AWG wires), crimpers with terminal-specific dies, continuity testers (verifying <0.5Ω resistance), cable shears (clean cuts on 2-0 AWG), heat guns (315-400°C for shrink tubing), and weatherproof labels—ensuring professional, reliable results.
